Gluten Free and Vegetarian Polenta Pizza

It’s apparently polenta week! Maybe I’m feeling inspired by corn? More realistically, I accidentally bought a brand new bag of cornmeal, not realizing I had not one, but two, already at home.

So bring on the cornmeal recipes!

Don’t worry, I won’t bombard you. But I’m pretty excited to experiment with it because I’ve only ever used it for sprinkling beneath a pizza crust so it won’t stick to the pan.

Speaking of pizza…

photo 5


What You Need to Make the Crust:

  • 1 cup cornmeal plus a little extra to line the pan
  • 1 1/2 cups water
  • 3/4 cup milk (I used almond – any kind of dairy-free milk would work too)
  • 1 tbsp olive oil

What You Need for Toppings:

So obviously you can use whatever you want for toppings, and I definitely plan to make this again and switch out the spinach for basil – yum!

  • Thinly sliced tomato
  • Spinach leaves
  • Thinly sliced summer and zucchini squash
  • Mozzarella cheese (grated or sliced)
  • 1 cup balsamic vinegar

What You Do:

Preheat your oven to 375F

Boil the water and milk in a medium pot. When it begins to boil, slowly add the cornmeal while simultaneously (as much as possible anyways) turning the heat down to a slow boil.

Stir well to avoid clumping. If it clumps try to just break them apart. Then cover and let simmer for about 15 minutes until it becomes thicker.

photo 1 (2)Add olive oil. Stir until thickened. I had to add a bit more cornmeal to make the polenta more of a pizza dough consistency.

While this is going on, sprinkle some cornmeal on your pizza stone or pan.

Once the polenta starts moving in a pizza-dough-type ball, remove from the pot. Spread slowly and evenly over the pizza stone or pan until 1/4 inch thick with no rips or holes.

I put the whole thing in the fridge for about half an hour to help it solidify more, but I have a hunch you could skip this step.

After I took it out of the fridge, I put it in the oven, topping-free, for about 15 minutes to burn off any excess water.

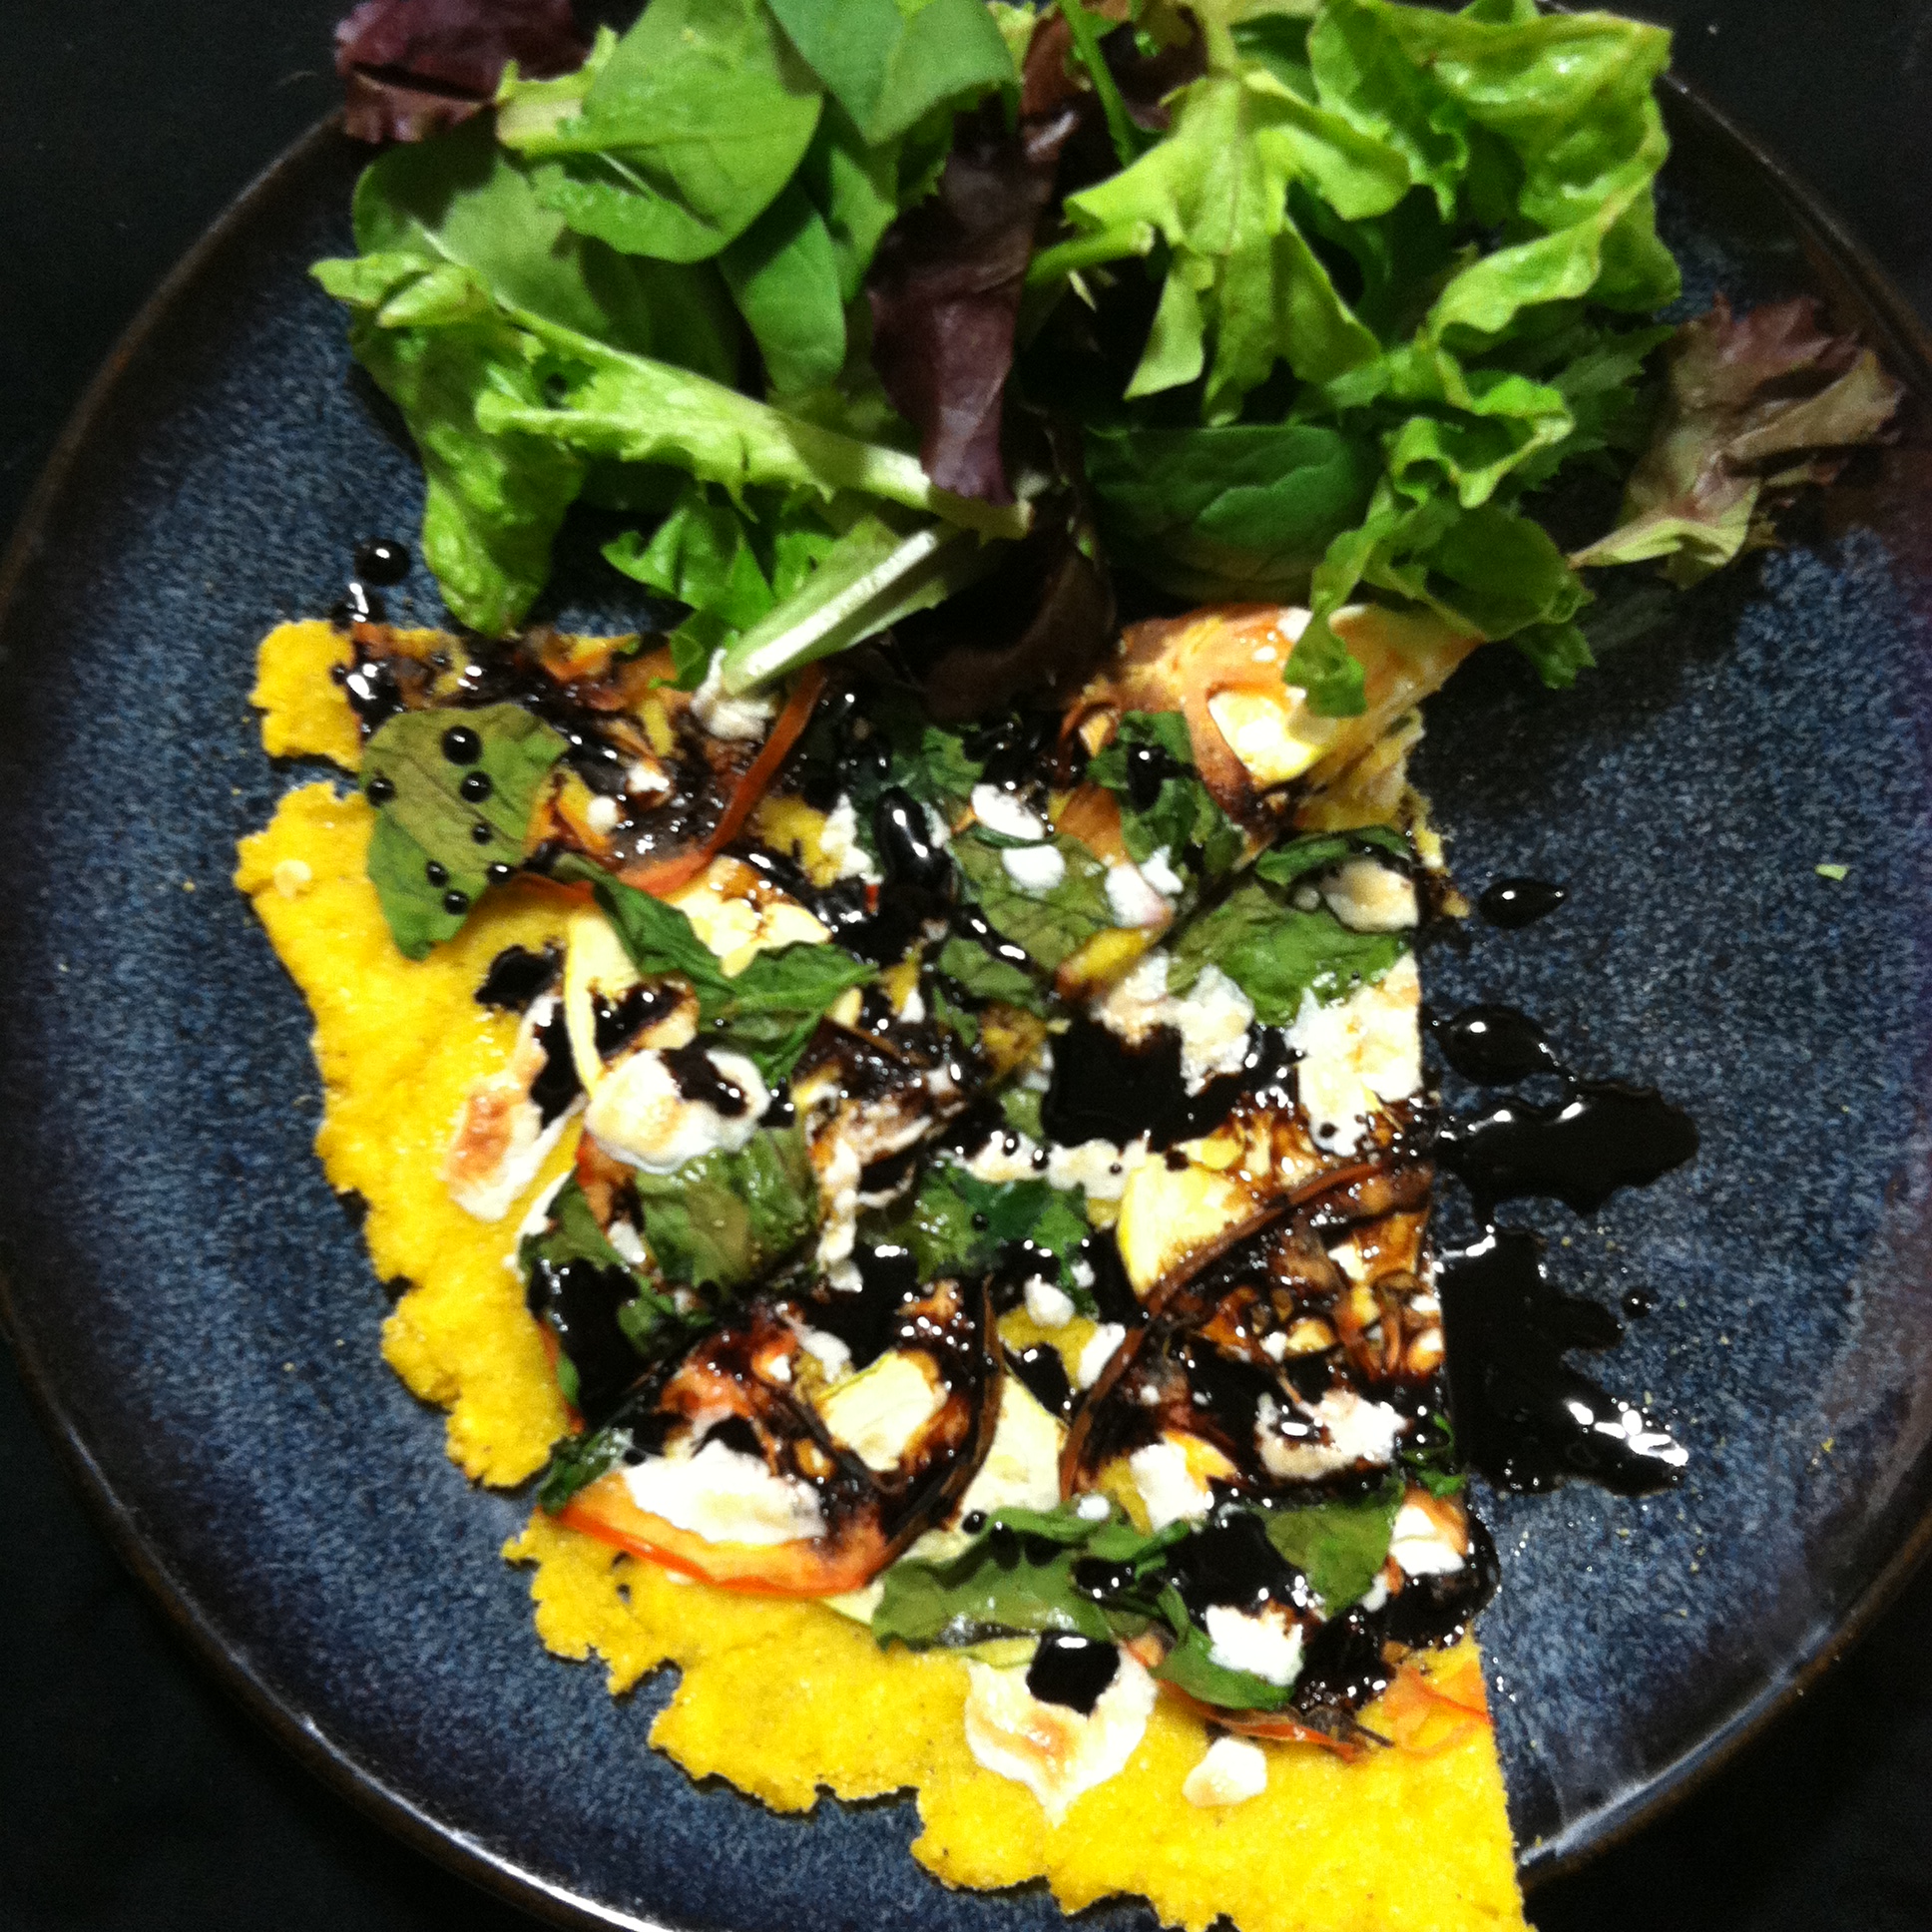
Then, it was time for the toppings! Pile them on, then bake for 12-15 minutes!

While it’s baking, make your balsamic reduction by slow boiling the balsamic vinegar. This takes 15-20 minutes. It will become syrupy, and you can test the progress by letting it drip off a spoon. Watch it closely once the level gets low because it will burn if you don’t remove it from the heat as soon as it fully reduces and becomes syrupy.

Drizzle it over the finished pizza and you’re done!

photo 3

Pro Tip: Unlike real pizza, this one doesn’t taste too awesome straight out of the fridge the day after. Heat this up in a toaster oven or conventional oven if you can! Microwaving would probably be ok too!


Vegetarian Polenta Stuffed Poblano Peppers

It’s that time of the month where I have to do a serious assessment of what’s in the fridge. I hate nothing more than reaching into the crisper drawer to grab the tomatoes I bought to make sauce and finding that some – or, GASP!, all – of them have gone bad.

My only consolation is being able to feed my rotten food to the worms in my vermicompost bin, but it’s still food I needed for dinner and no longer have!

My stray vegetable roundup this week resulted in this comfort food dish that was fairly quick to make and perfect after a long day at work.

Preheat Oven to 300F

015

What You Need:

  • 5-6 poblano peppers
  • 1 tbsp olive oil
  • Half a small onion
  • 1 tbsp minced garlic
  • 2 cups kale
  • 1 cup cornmeal
  • 2 cups water
  • 3-4 cups tomato sauce

What You Do To Make the Polenta:

Boil 2 cups of water. When it boils, add 1 cup cornmeal and immediately remove from heat as the cornmeal will thicken super quick in the bioling water. Don’t be alarmed, this literally takes a matter of seconds.

Stir until thickened and add additional water if necessary (I usually have to) to make it creamier. Your polenta should be creamy and easy to stir when complete.

What You Do To Make the Filling:

Slice the tops off the poblano peppers leaving as much pepper on as you can. Cut the pepper in half lengthwise and clean out the seeds and veins.

013Lay the peppers out on a baking sheet and bake for about 15 minutes. Flip them about halfway through and take out when the skin starts to pinch.

While the peppers bake, warm olive oil in a large pan on medium heat. Add the onion and garlic and simmer, stirring frequently, until translucent and soft.

Add any other veggies you want. I added 2 chopped serrano peppers for a little kick and the kale, stirring it until it was steamed and reduced.

Add the onion mixture to your polenta, stirring until well mixed.

Place each pepper in a baking dish with sides, and spoon the polenta mixture into each poblano pepper. Top with tomato sauce and goat cheese, and bake until cheese is melted.

Pro Tip: Consider adding cooked sausage or your favorite kind of bean to the polenta mixture for some protein!

012

Potato, Leek and Kale Soup

So Mike has bronchitis. He’s not thrilled, for obvious reasons, but also because he’s been sick straight through some of the nicest days we’ve had in months.

The sun is out, the temperatures are steadily warming up, and there are legitimate flowers growing in our yard. It’s amazing! And on nights like we’ve been having, I naturally gravitate toward the grill. Except when my husband is sick. On nights like THAT, I gravitate toward soup.

Leek Soup (8)

There’s been a leek in our fridge for more than a week, and unlike my interaction with most vegetables, I was kind of stumped on how to use it, and had forgotten why I bought it in the first place.

I know when people are sick, chicken noodle soup is the natural go-to, but I decided to switch it up and make a creamy potato leek soup – completely vegetarian, and completely daily and gluten free.

Leek Soup (1)

What You Need:

  • One large leek, top layer and leaves removed, sliced
  • 4-5 small to medium yellow potatoes, quartered (you can peel them if you want – I didn’t)
  • 3 cloves garlic, chopped
  • 1/2 yellow onion, roughly chopped
  • 3-4 cups kale, chopped
  • 3 cups vegetable broth (I got mine this way)
  • 1/3 cup almond or soy milk
  • 2 tbsp olive oil
  • 1 tbsp ground black pepper

What You Do: Leek Soup (5)

Fill a large saucepan halfway with water and bring to a boil. Add the potatoes and cook at a slow boil for about 30 minutes or until soft.

Drain the potatoes into a strainer and set aside.

Leek Soup (2) In the same saucepan, heat oil on medium. Add sliced l  leeks, chopped onion and chopped garlic and simmer for  about 20 minutes. Add the chopped kale about halfway  through (after about 10 minutes) and simmer all until soft  and kale has reduced.

Add the potatoes and stir. Then add the vegetable broth  and bring the mixture to a slow boil.

Add the black pepper and stir. Remove from heat.

Pour the mixture into a food processor. If you like your soup chunkier like I do, pulse  until just blended. If you want a smoother soup, blend for longer until creamy.

Add the soup back into the saucepan. Add the almond or soy milk (or any milk of your choice) and stir.

It’s ready to serve!

Leek Soup (10)


Pro Tip: Make this soup a little spicy (you know I did) by adding a hot pepper of your choice into the mixture, or simply sprinkling some crushed red pepper on the soup once it’s ready to serve.

Healthy and Easy Quinoa Stuffed Poblano Peppers

Peppers4

Well, life got in the way of cooking for awhile but I’m back! I’ve been training pretty hard for my 20 mile race (which was May 29), so our dinners were mostly pasta, pizza, tacos or pb&j, and about as simplified as possible so I could go to bed at a reasonable hour. But I’m happy to report I beat my 2013 finish by 12 minutes and ran it 40 seconds faster per mile. It was such a good feeling when I finished, especially because the weather was terrible all day – just super rainy and cold. What a relief to be done!

1606281_10101050435251241_747843892_o

Approaching the finish line!

I feel like I owe some of my success to a massive carbo-load the night before the race. I inhaled more bread and pretzel in one sitting than ever before and it was really fun! But I was craving a real, home-cooked and healthy meal by the time my body was done recovering from the race, so I made the best recipe I could think of to deliver on all those cravings with as minimal time on my feet in the kitchen as possible.

That’s how we ended up with quinoa stuffed poblano peppers. I love this dish because it’s really easy and always delicious, and poblanos have a great taste – sweet with a little spicy kick.


Peppers3

I used 4 medium-sized poblano peppers. One stuffed pepper is more than enough for a single serving meal – even for Mike – and the leftovers are just as tasty reheated a day (or two or three!) after.

Preheat oven to 375F

Peppers2

What You Need

  • Poblano peppers (any number you want/need)
  • 1 cup quinoa
  • 1 sweet onion, chopped
  • 1 jalapeno, chopped (optional)
  • 2 cloves garlic, minced
  • 1 jar sun-dried tomatoes, drained of oil and chopped
  • 1 jar tomato sauce (I made my own tomato sauce using this recipe)
  • About 1 cup Parmesan cheese

What You Do

Slice off the stem end of the poblanos, being careful not to take off too much of the pepper itself. Empty out the insides and seeds using your fingers.

Place the poblanos on a sheetpan lined with parchment paper and bake them in the oven for about 15 minutes or until the skin starts to pinch. (Leave the oven on when the peppers are done – you need to bake them again at the same temperature once they’re stuffed)

While the peppers are baking, cook your quinoa according to package directions. I boiled 2 cups of water and added one cup of quinoa, and simmered, covered, until the water was gone. Obviously if you’re stuffing more than 4 peppers, you might want to make more quinoa.

While the quinoa is cooking, put a tablespoon of olive oil in a pan and heat the onions, jalapeno and garlic for about 5 minutes or until the onions become translucent and soft.

Stir the onion mixture into the quinoa until combined. Peppers

In a large bowl, mix the sun-dried tomatoes with the tomato sauce.

Stuff your slightly baked peppers with the quinoa mixture. Lay extra quinoa on the bottom of the baking dish like a bed for the peppers. Place the stuffed peppers on their bed and cover with tomato sauce. Sprinkle with parmesan cheese.

Bake at 375F for about 20 minutes.

Serve with additional cheese on top if you want. I love my cheese!


Pro Tip: You can really stuff quite a bit of the quinoa mixture into these peppers! Gently tap the bottom end of the pepper on the palm of your hand or a dish to pack down the quinoa. Once you near the top of the pepper with stuffing, push the quinoa down with your spoon for more room.

Peppers5


Slow Cooker Pulled Pork with Sweet Potato and Beer

On Sunday I received a text that spoke directly to my heart.

photo

The text came from my friend Mary, and to be fair, we had finished a 17 mile run just hours earlier. But if I’m going to be honest here, I will admit that I usually feel like I want to eat everything, regardless of how far I’ve run or even whether I’ve run at all.

I have a lot of cravings that tend to dictate what Mike and I eat for dinner.

IMG_3699

As you probably guessed, On Sunday like my friend Mary, I too felt like eating everything. To handle this feeling in the most mature and self-controlled way possible, I ate a handful of sour jelly beans and drove to the supermarket to buy ingredients for one of my favorite comfort food meals – slow cooker pulled pork. I felt like I needed comfort food – who doesn’t?!?

Knowing Mike and I couldn’t eat it until Monday night practically drove me insane, but it was well worth the wait. Absolutely delish! And I got kudos for making pork (Mike’s all-time fav meat dish that I rarely make).

IMG_3667

Seasoned Pork ready to start slow cooking.

IMG_3661

Spice Rub!

What You Need:

  • A boneless pork shoulder (also commonly called pork butt) between 3 and 5 pounds
  • One large sweet potato, grated or shredded (I used my food processor)
  • One large yellow onion, thinly sliced
  • 3 garlic cloves, minced
  • 3-4 scallions, chopped
  • 1 1/4 cup beer (I used a brown ale. If you don’t want to use beer, the same amount of vegetable or chicken broth works too)
  • 1 tbsp brown sugar
  • 1 tbsp chili powder
  • 1 tbsp salt
  • 1 tbsp ground red pepper (cayenne)
  • 1/2 tsp ground cumin
  • 1/4 tsp ground cinnamon
  • 2 cups of your favorite BBQ sauce (I used Thicker Style Hot Bone Suckin’ Sauce)

IMG_3645What You Do:

Line the bottom of the crock pot dish with the graded or shredded sweet potato, the thinly sliced onion, minced garlic and chopped scallions.

Pour the beer over the mixture. Drink the rest!

In a small bowl, mix together the brown sugar, chili powder, salt, cayenne, cumin and cinnamon.

Prepare your pork. I sliced it into large chunks and cut off as much fat as I could.

Rub the spice mixture over the pork pieces and place the pork over the onion mixture in the crock pot dish.

Set the crock pot on High for 6-8 hours OR on Low for 8-10 hours.

When it’s ready, spoon the pork out of the crock pot onto a separate plate.

Drain the liquid left in the crock pot through a strainer and INTO A POT so it doesn’t go down the drain. (This is only important to do if you do not wish to use BBQ sauce. If that’s the case, see below for the Pro Tip).

Return the onion mixture that was captured in the strainer to the crock pot. Return the pork to the crock pot and with a fork, begin pulling it apart until it is all looking like goodness.

Add your BBQ sauce and it’s ready to serve!

Pro Tip: If you do not wish to use BBQ sauce, pour the strained liquid back into the pulled pork mixture slowly until the pork is moistened (you may not need all of it!)

Pro Tip #2: Select a gluten-free BBQ sauce for a totally GF meal!

Pro Tip #3: Take advantage of the fact that this recipe allows you to say “pork butt” multiple times in conversation.

Smuttynose Old Brown Dog

Smuttynose Old Brown Dog – a perfect beer for this recipe!

Spaghetti Squash with Homemade Tomato Sauce

IMG_3613

You will never need to eat pasta again. Ever.

I’m serious. And I’m Italian. So this goes against everything my people believe but I’m sticking to it.

IMG_3615

When I would see recipes for spaghetti squash, I tossed them aside, figuring it was just a weird stringy food that could never take the place of my beloved whole wheat spaghetti. But I came across a large spaghetti squash at a farmer’s market this winter and talked to the farmer about it. He couldn’t believe I’d never made one before.

When people who grow food for a living tell me that I “have to try” something, I don’t take it lightly. I took that sucker home, and cooked it up following his (suspiciously simple) directions.

Well first of all, I felt like a food genius. I brought Mike in to see the cooked squash in action.

“Check this out!” I told him, gently plying away the spaghetti-like layers of sweet smelling squash with a fork. I know he was impressed. Who wouldn’t be?

IMG_3594

And second of all, it isn’t some weird stringy food. It’s great. Drenched in homemade tomato sauce, it’s almost like eating actual spaghetti, except with fewer calories and carbs. And one spaghetti squash makes quite a bit of food, and is one of those leftovers that makes the early part of my workday a time where I am simply waiting to eat.

Preheat oven to 450F

What You Need:

  • A spaghetti squash (1-2 pounds)
  • Tomato sauce. For a great homemade recipe that you can make simultaneously with the squash (efficiency!!!!) use this recipe.

What You Do:

Halve the spaghetti squash lengthwise from the stem to the bottom. Scoop out the seeds and extra stuff.

Place the halves insides down on a baking sheet (you can put foil under them if you want to make the cleanup easier).

**You do not need to use any oil! The squash produces liquid while it bakes and will not stick.**

Bake for about 40 minutes or until the skin starts to pucker and brown. You will also see liquid start to seep out around the base of the squash. You may also see the juices start to caramelize around the base of the squash – this is totally ok and really enhances the flavor. But that also means it’s time to take it out of the oven.

With a fork, gently separate the stringy squash layers from the skin and scoop onto your plate or into a bowl.

Cover in tomato sauce and freshly shredded Parmesan and enjoy!

IMG_3615

Pro Tip: You can save the skins and reuse them for in a homemade vegetable broth! Simply freeze them in a large bag with other vegetable cooking scraps until you need to make your broth!

A Lovely and Filling Kale Risotto

There are a few things I am sure of in this life: A good meal in a pinch does not have to require a trip to the grocery store; a Sunday-night meal plan will invariably improve your week; and sometimes you just NEED chocolate cake.

IMG_3616

One important fact about me is that I like to run (like actually LIKE  it), and one of the biggest reasons aside from the obvious health benefit is that it makes me feel more comfortable about eating all of the foods I love in quantities that might scare average people.

335077_961440997481_1251305287_o

2-pound lobstah

But with winter in New Hampshire being a stubborn thorn in my side, it was easy to fall into a rut of not running as much, and instead eating the chocolate/cookies/leftover pie ruthlessly decorating our office kitchen table.

BUT I have a 20 mile race coming up at the end of March, so I’ve been making a much larger effort to make a healthy dinner every night and bring the leftovers for lunch so I don’t have an excuse to buy food out. Saves money and calories!

IMG_3605 IMG_3606 IMG_3610

Last night’s dinner needed to produce enough food to make two lunches, and since I didn’t get to start cooking until 8pm (ugh) it needed to be fairly quick. By 8:30pm we had this kale risotto, which was indeed both lovely and filling.

What You Need:

  • 1 cup uncooked Arborio (Risotto) rice
  • 2 garlic cloves, minced
  • 1/2 of a large, red onion OR a large shallot (I don’t always have a shallot on hand)
  • 5 cups vegetable broth (need some in a pinch? check out this post)
  • 1 tbsp olive oil
  • 3 cups chopped kale (no stems – unless you like them!)

What You Do:

Heat a large wok or skillet at Medium to Medium-High and add the oil.

Add the chopped garlic and onion, and stir to coat evenly in oil.

Add the cup of Arborio rice and stir to mix.

One cup at a time, add the vegetable broth, stirring continuously between adding each cup. You want the broth to be at a low simmer in the skillet.

Once you’ve added the last cup of broth, add the kale. Stir to combine and lower the heat. Stir and cook until the kale reduces and cooks fully. Taste tests are always helpful! 🙂

Pro Tip: If you actually stir the Risotto the entire time, it will come out AMAZING. I don’t care if you have to hire someone to stand there and do it – I have made this dish so many times and when I finally ignored the mess and dishes and actually stirred it continuously, the end result was SO worth it.

Ready for Anything Homemade Vegetable Broth

Do you ever feel a little bad about all the vegetable scraps that pile up while you’re preparing a meal? Onion peels (are they called peels?), the tops/stems of peppers, tomatoes, eggplants, broccoli and squashes – it’s a crazy amount of food in the end that you aren’t using in the actual recipe!

I did eventually start a vermicycle compost bin, which is a HUGE help, but one thing I love to do with these veggie scraps is use them again for my own personal mealtime gain before feeding them to the compost worms.

This vegetable broth recipe is a super simple solution to that problem that basically produces an entirely new meal AND will help you feel less wasteful. A win-win!

photo 1 (3)

Store all of your vegetable scraps in the freezer in a gallon-size bag and simply continue adding to it each time you cook. Then, whenever you need vegetable broth for cooking, all you need to do is follow these easy steps and you’ll have at-the-ready homemade broth.

                photo 2 (3)                                                    photo 3 (1)

What You Do:

  1. Boil a large pot of water
  2. Put a good amount of the frozen veggies directly into the boiling water
  3. Boil down until the veggies are soft and the water is visibly broth-like. Add salt or pepper if desired.
  4. Drain the water through a strainer directly into another large pot and it’s ready!

Pro Tip: Eliminate a step and make your dinner prep easier by making the broth ahead of time and freezing it. Then you can just defrost and use! (This photo is not great but this is a half-gallon container and I filled two with just one pot. Win!)

photo 4 (1)

Delicious Homemade Tomato Sauce

I have a teeny tiny obsession right now with making tomato sauce. For a long time, homemade sauce fell victim to a list of foods I was simply too intimidated to try and make. This list has been whittled down substantially in recent years, but once included homemade sushi, balsamic reduction, kale chips, homemade croutons, and roasted garlic (I know, I know. The directions are in the name. I still couldn’t do it).

IMG_3600

Ready for oven baking!

But tomato sauce has officially been not only removed from that list, but is a new all time favorite. What I love about homemade sauce is that it can be a different kind each time, depending on what’s in the fridge, or what I’m in the mood for. Absolutely anything can go in sauce – or nothing at all! I love pouring fresh, homemade sauce over spaghetti squash or pasta with freshly grated Parmesan cheese, risotto or a timeless favorite – English muffin pizzas 🙂

This is the basic recipe. Obviously the more sauce you want, the more tomatoes you have to use. Below the recipe are a bunch of other ingredient options, but they’re all just suggestions so go nuts with your vegetable drawer and experiment! This is one dish you cannot mess up.

photo 1 (1)

photo 2 (2)

Preheat your oven to 400F

What You Need:

  • 10-15 large plum tomatoes
  • Half a sweet onion, sliced
  • 3 small cloves of garlic or 2 large ones
  • 1 tbsp olive oil

What You Do:

Halve all the plum tomatoes, slice the onion (can be done roughly, it’s all getting blended up at the end), mince the garlic.

Pour the olive oil into the bottom of a ceramic or glass baking dish and use the facedown half of one plum tomato to spread it around. The bottom of the dish should be very thinly coated with oil. You don’t need a lot because the tomatoes produce a lot of juice as they’re baking.

Line the bottom of the baking dish with the plum tomatoes, face down. On each layer, sprinkle the garlic and onions so they are intermixed.

Bake for 40 minutes or until the tomatoes are pinched and soft when poked.

Load everything into a food processor and blend until well mixed and there are no visible chunks. Use desired amount on your food, and freeze leftover sauce for easy defrosting and use with your  next meal!

Pro Tip: Add any of the following ingredients, singularly or in combination, to the baking dish to make different and tasty sauces. I have tried all of these, so I can testify they are all delicious.

  • Basil (goes great in all sauces regardless of ingredients)
  • Mushrooms
  • Eggplant
  • Sun-dried tomatoes
  • Zucchini squash
  • Hot peppers or sweet peppers (or both! or, if you’re obsessed with spicy foods like me, add hot peppers to every homemade sauce dish for a little ziing!)
  • Shallots
  • Sausage (add cooked sausage when the sauce is ready to serve, or blend it into the sauce in the food processor)
  • Scallions
  • Artichokes

Loaded Black Bean Turkey Burgers

photo 3 (2)

I love turkey burger night at our house. I go all out – way past the point I probably should considering it began (more than a year ago) as a quick and easy weeknight dinner solution. But I got carried away. And that’s OK, because the end result is always totally worth it. And for a turkey burger, I consider that a decent dinner achievement.

photo 1  photo 2   photo 1

It happened because Mike eats a LOT, and I like leftovers. Since those two things are hard to reconcile, I started thinking of ways to beef up my turkey, so to speak. You might find there are more other ingredients than turkey, but this recipe makes 6-8 burgers so it’s perfect for a family dinner, or a dinner for two with plenty of leftovers 🙂

What You’ll Need:

  • 1 package ground turkey
  • 1 can black beans, drained and rinsed
  • 3/4 cup grated sweet potato
  • 1 bell pepper, any color, chopped
  • 3/4 cup chopped yellow onion
  •  2 cloves garlic, minced
  • Goat cheese (or cheese of choice)

What You Do:

Heat 2 tbsps of olive oil in a large skillet on medium.

In a food processor, blend black beans and sweet potato until course, not smooth.

Add all other ingredients – except the cheese – and mix well. Form into burger patties and place in the skillet. Form a small hole in the center of each patty. Place a few pieces of cheese in each and cover up again.

Cook slowly uncovered, flipping frequently until each side is browned.

Pro Tip: Serve with avocado and pea shoots on top.

photo 2 (1)