Haddock Baked in Spicy Cajun Tomato Sauce

I think we all kind of feel the same right now. It’s that post-holiday food coma and seemingly perpetual exhaustion from too many glorious days off that makes it feel almost impossible to get back on track, go back to work and get motivated to put down the holiday cookies and champagne and pick up a salad.

Haddock (12)

One thing that helps me is cooking up a big batch of something super light and super healthy so I can enjoy it for dinner and then take the leftovers for lunch. Having a set lunch plan helps me avoid unnecessary mid-day splurges at the bakery and sandwich shop located RIGHT BELOW MY OFFICE. They sell bagels and sandwiches and cookies and coffee. Oh, so an entire day’s worth of food less than 50 feet from my desk? Awesome. A day without a pre-meditated food plan basically means sacrificing my diet to this restaurant.

Haddock (9)

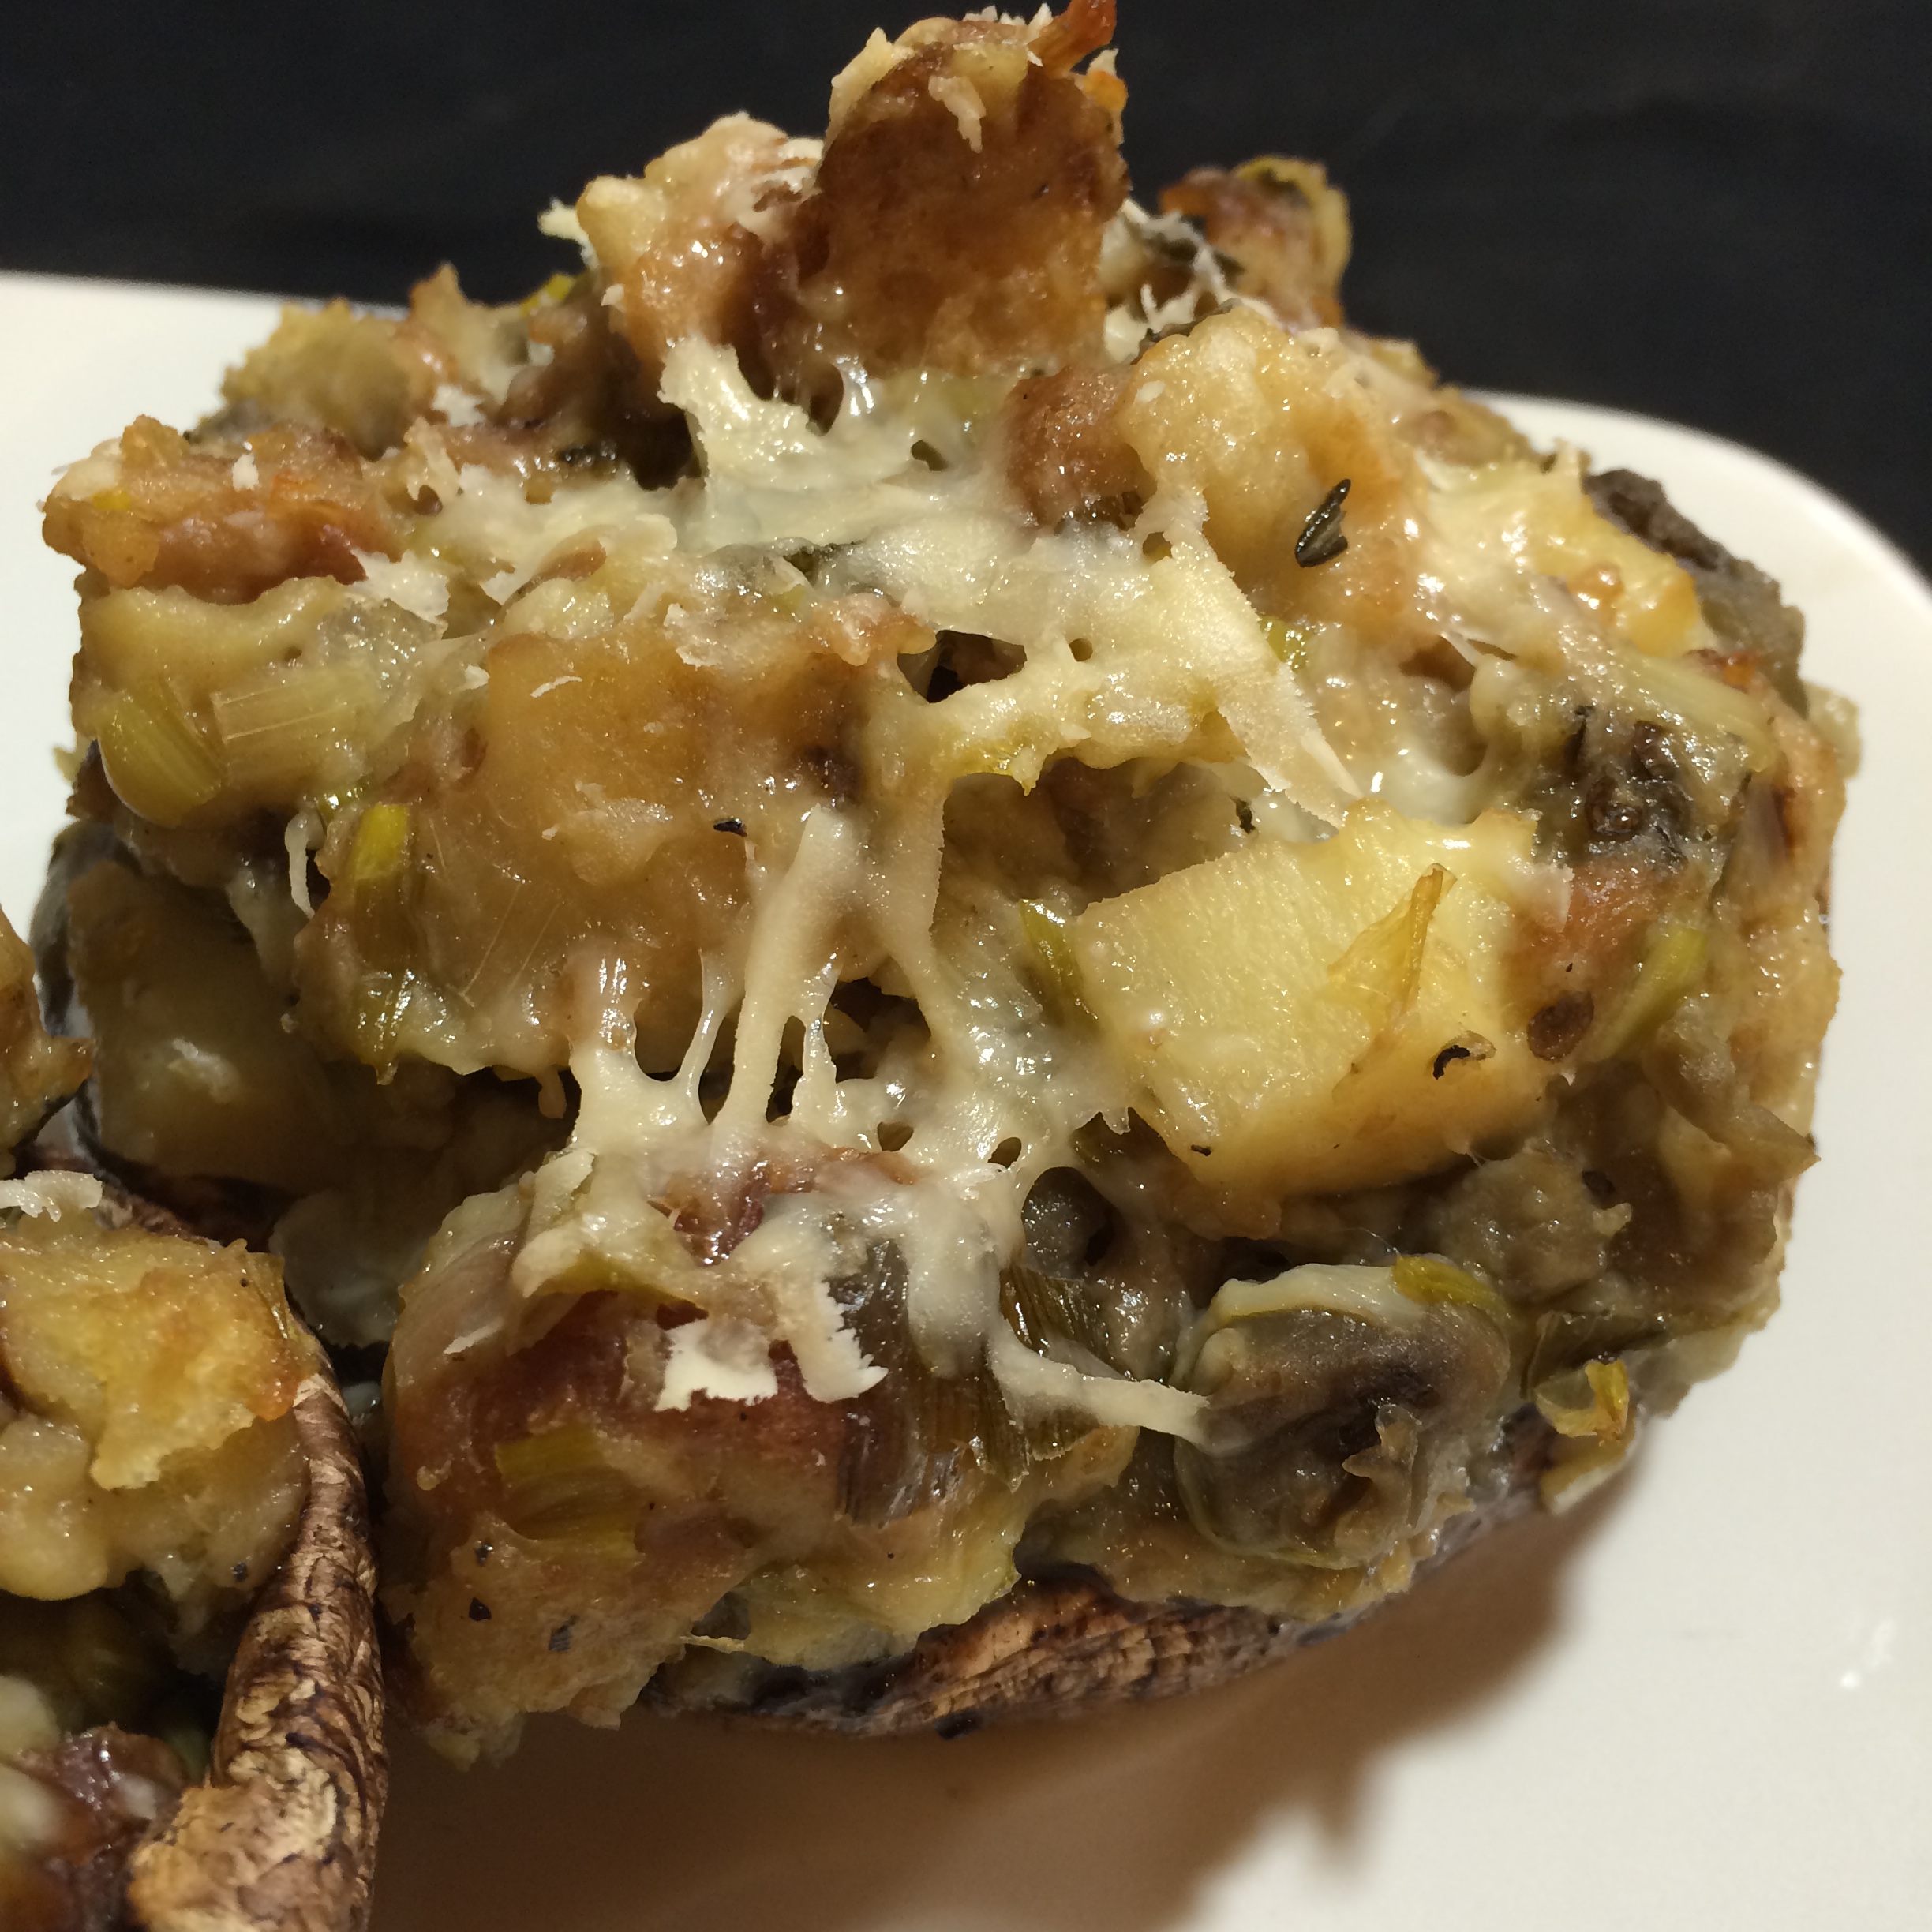
So, to avoid taking the easy route in the new year, I wanted to start things off with just the right dish to last a couple days. I prepared it while Mike was at work so he would have something yummy to come home to, so with his seal of approval under my belt, I present you with this delicious Haddock dish.

Haddock (2)

What You Need: 

  • 1 tbsp olive oil
  • 3/4 cup onion, diced
  • 2 cloves garlic, minced
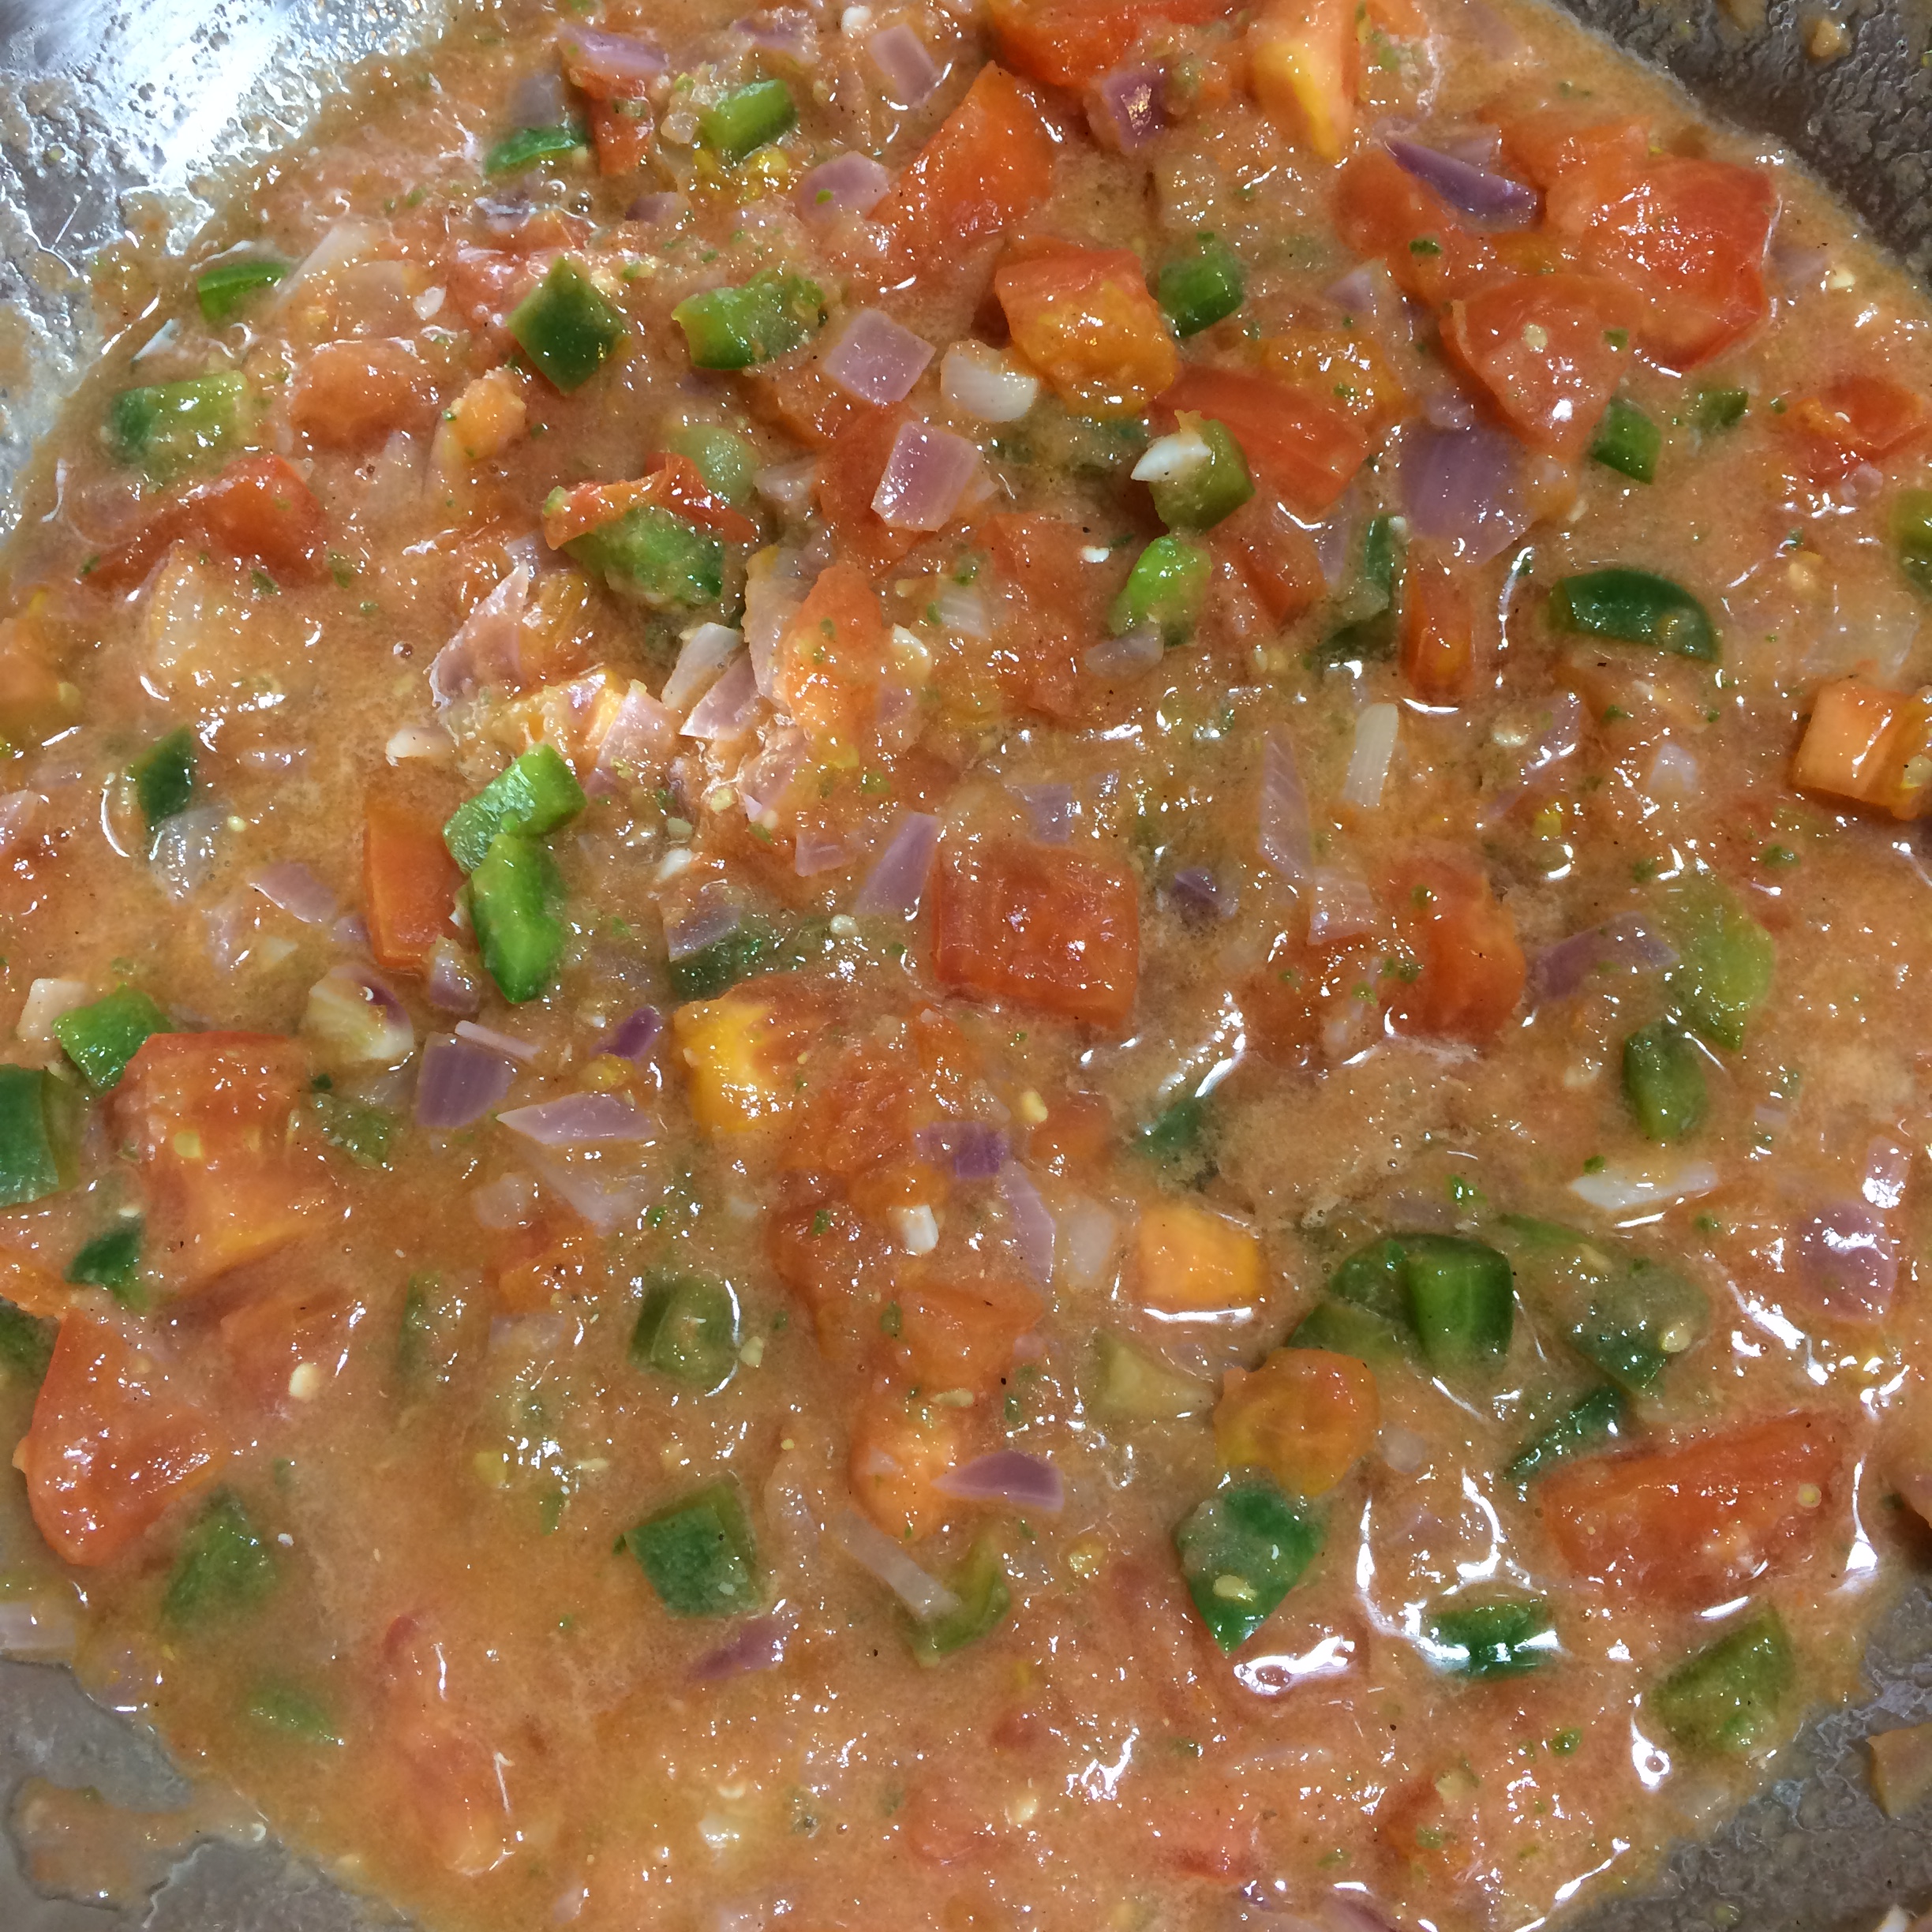
    • 3/4 cup chopped green pepper
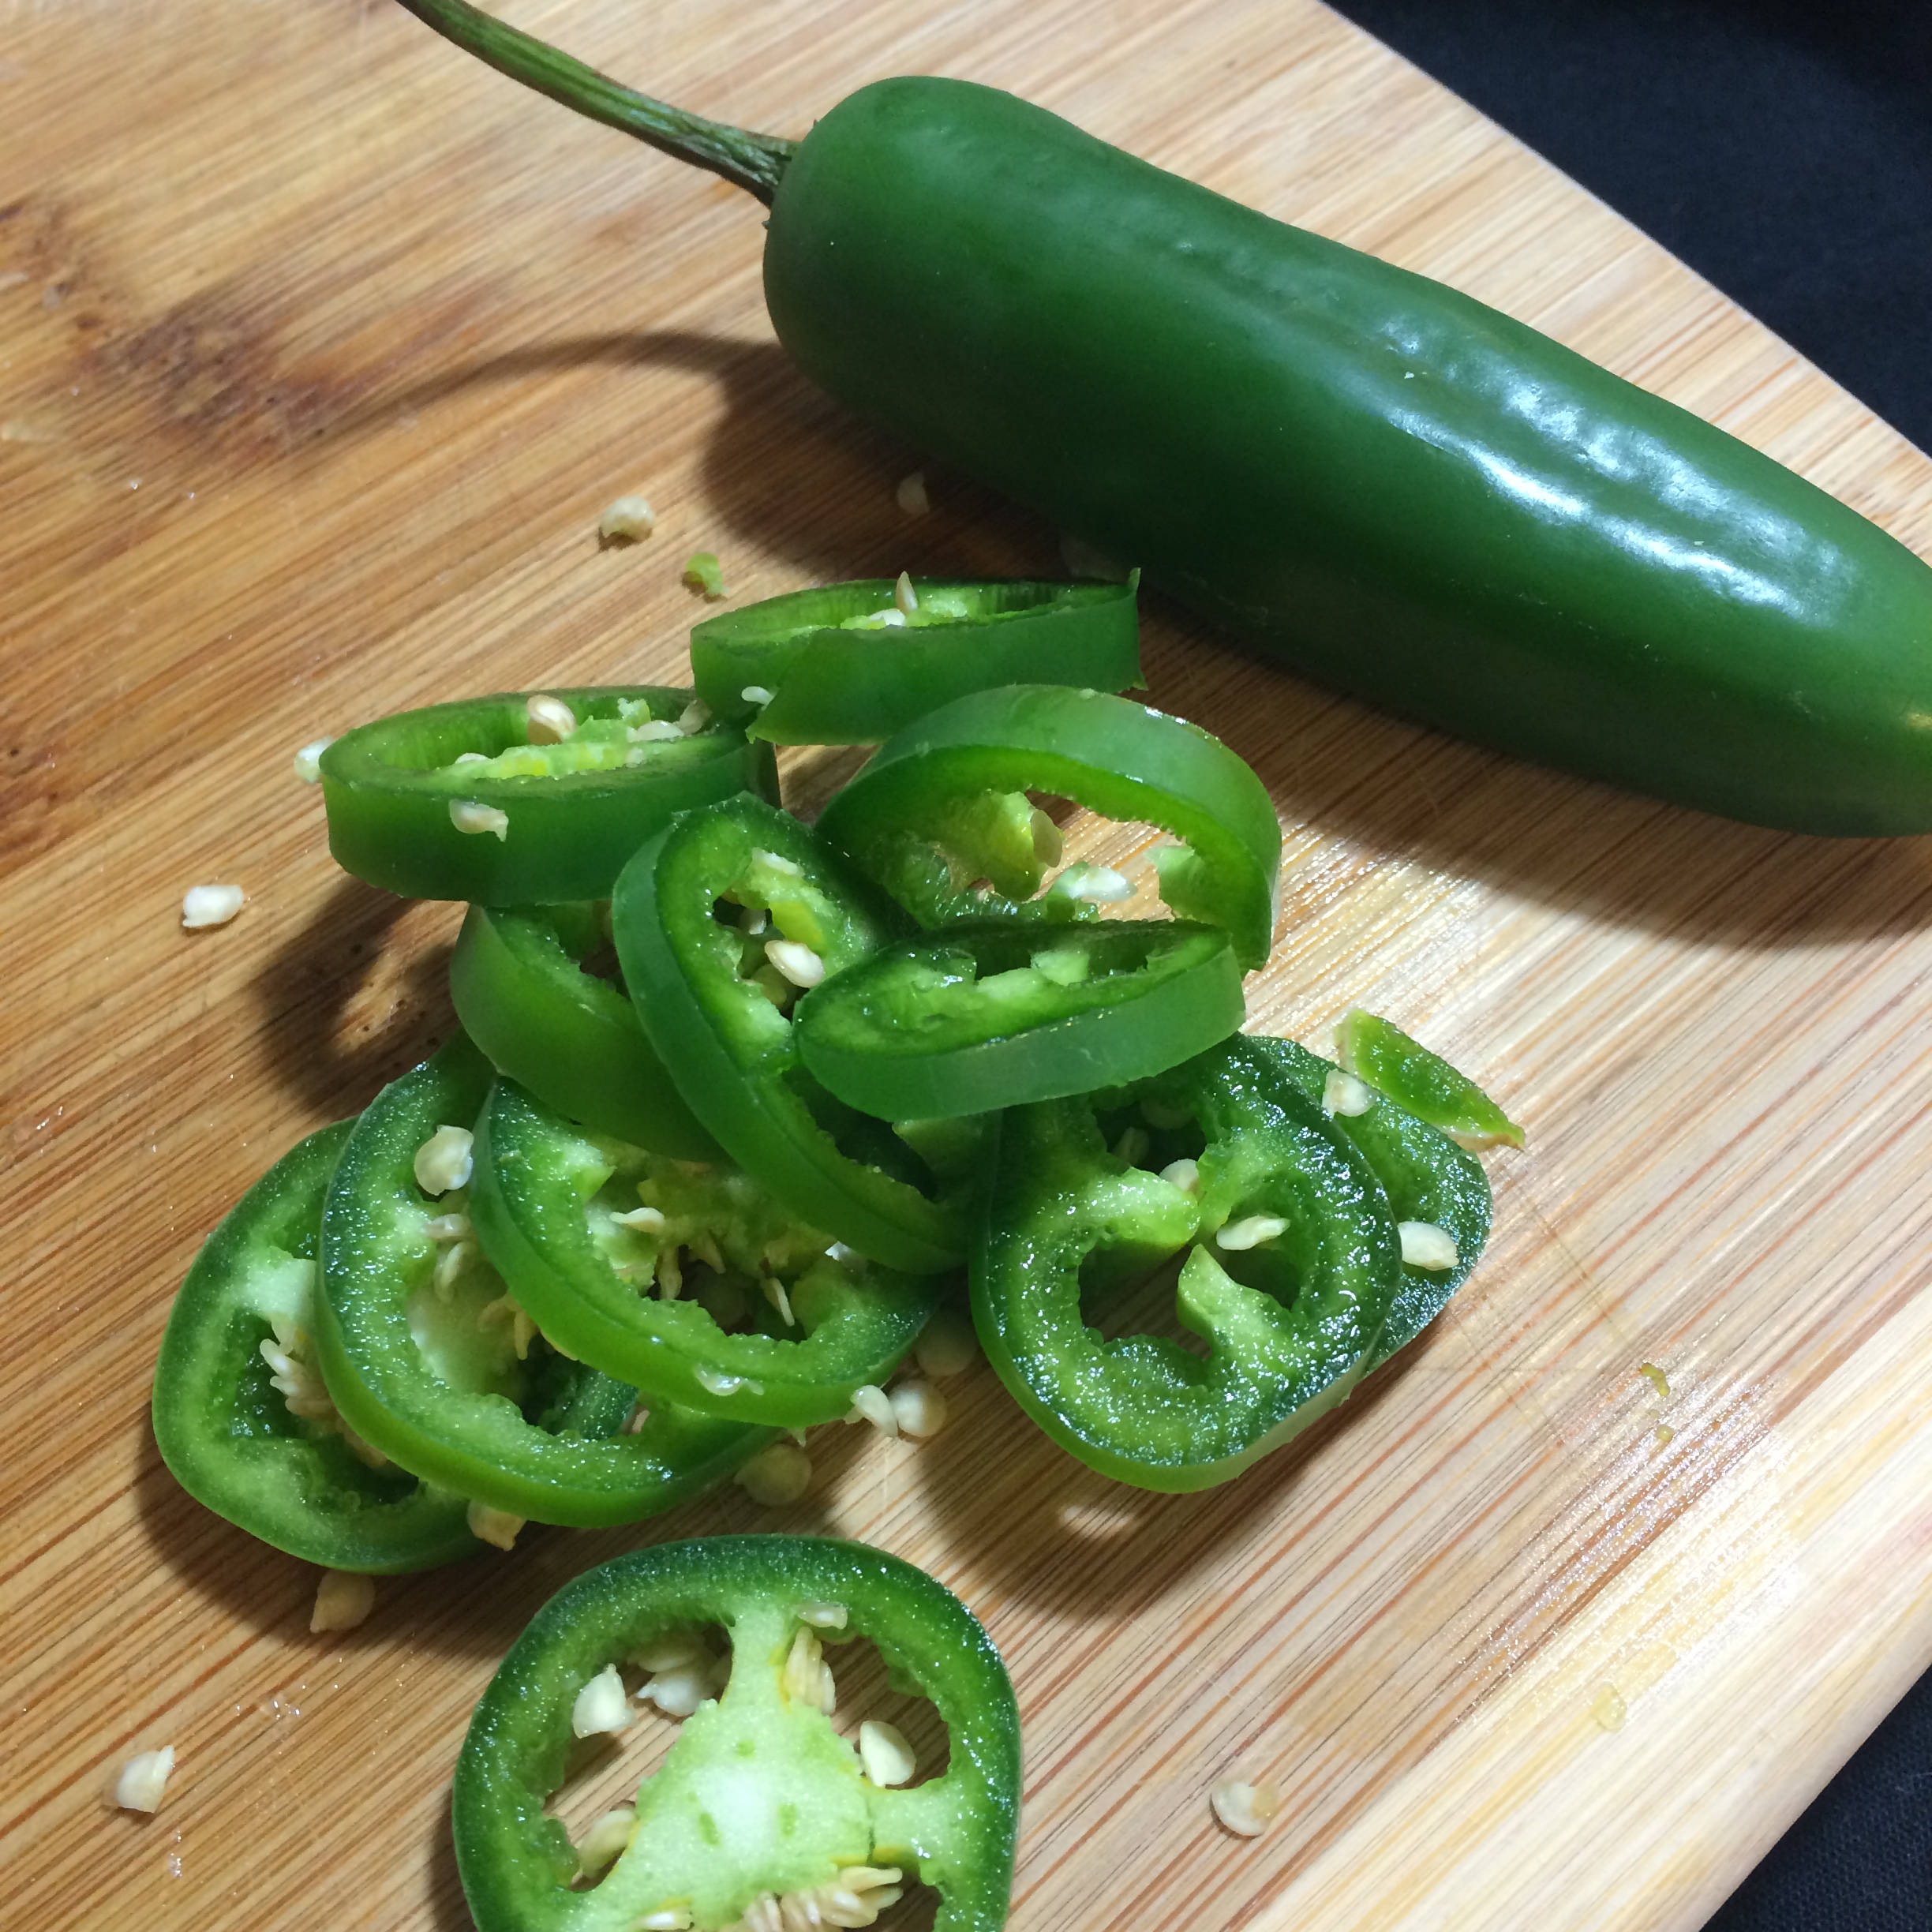
  • 1 jalapeno, seeds removed and discarded if desired for less heat
  • 1 tbsp white wine
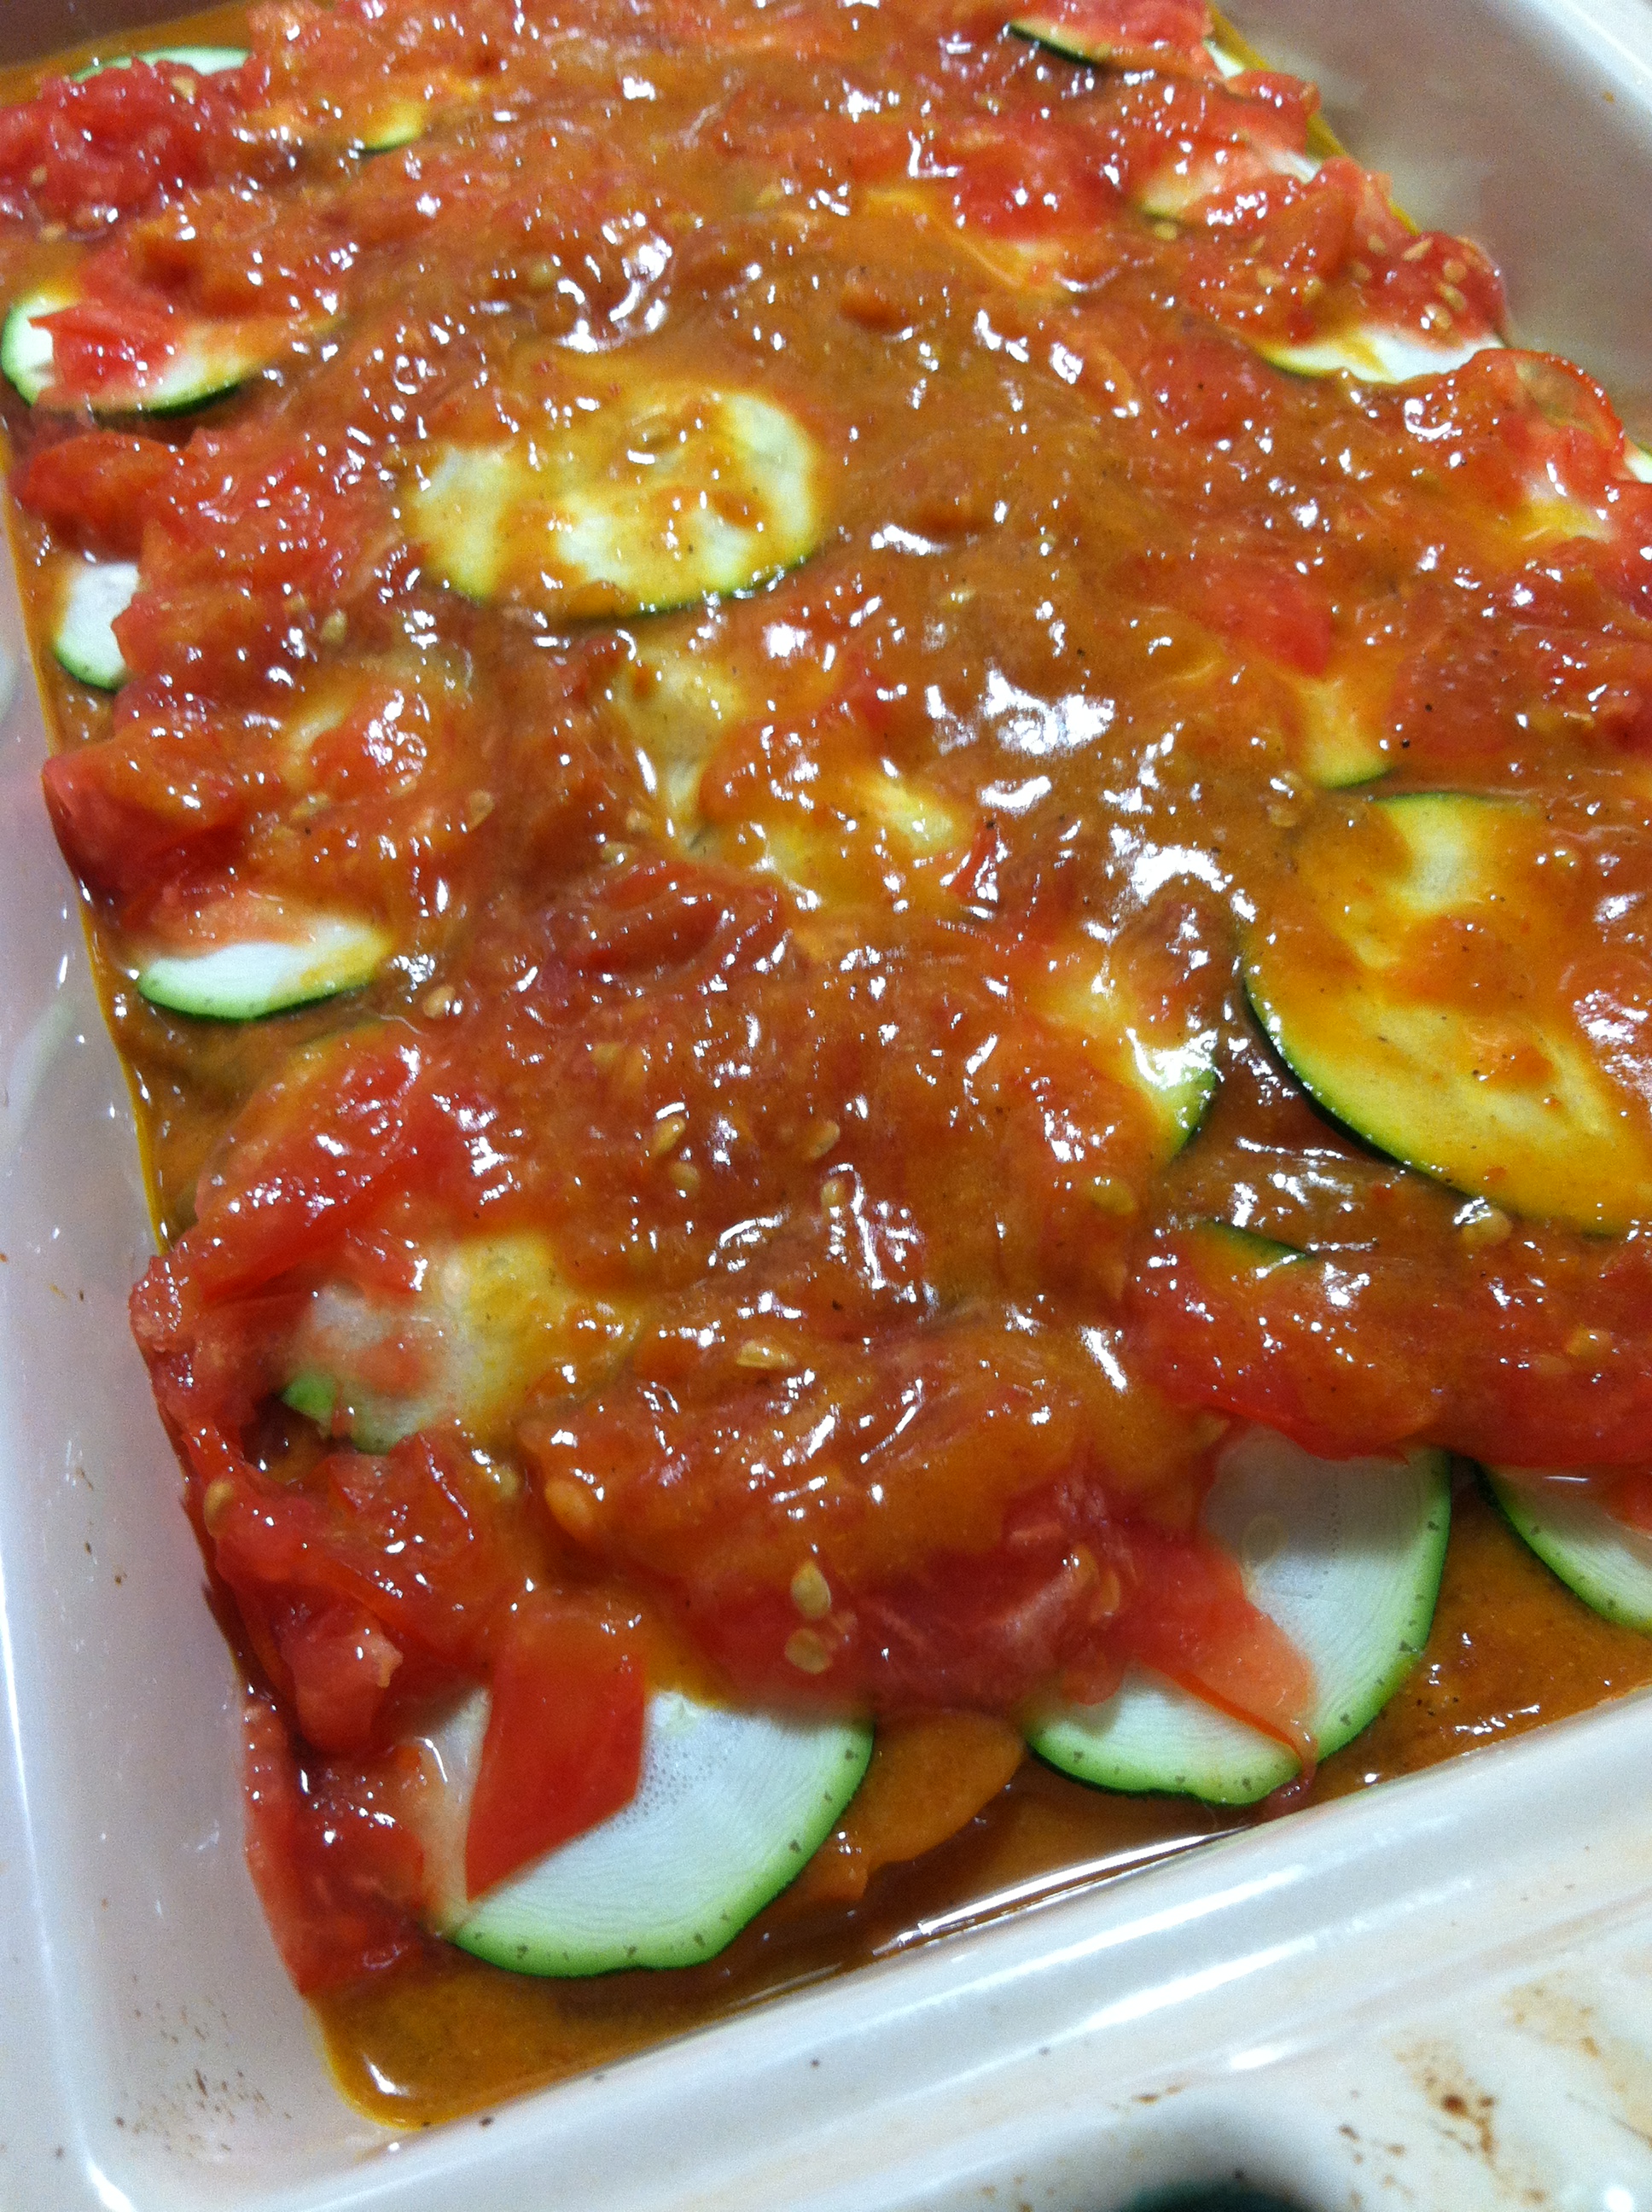
  • 3 cups tomatoes, diced, with juices (canned diced tomatoes also work for this)
  • 1 tbsp Cajun seasoning
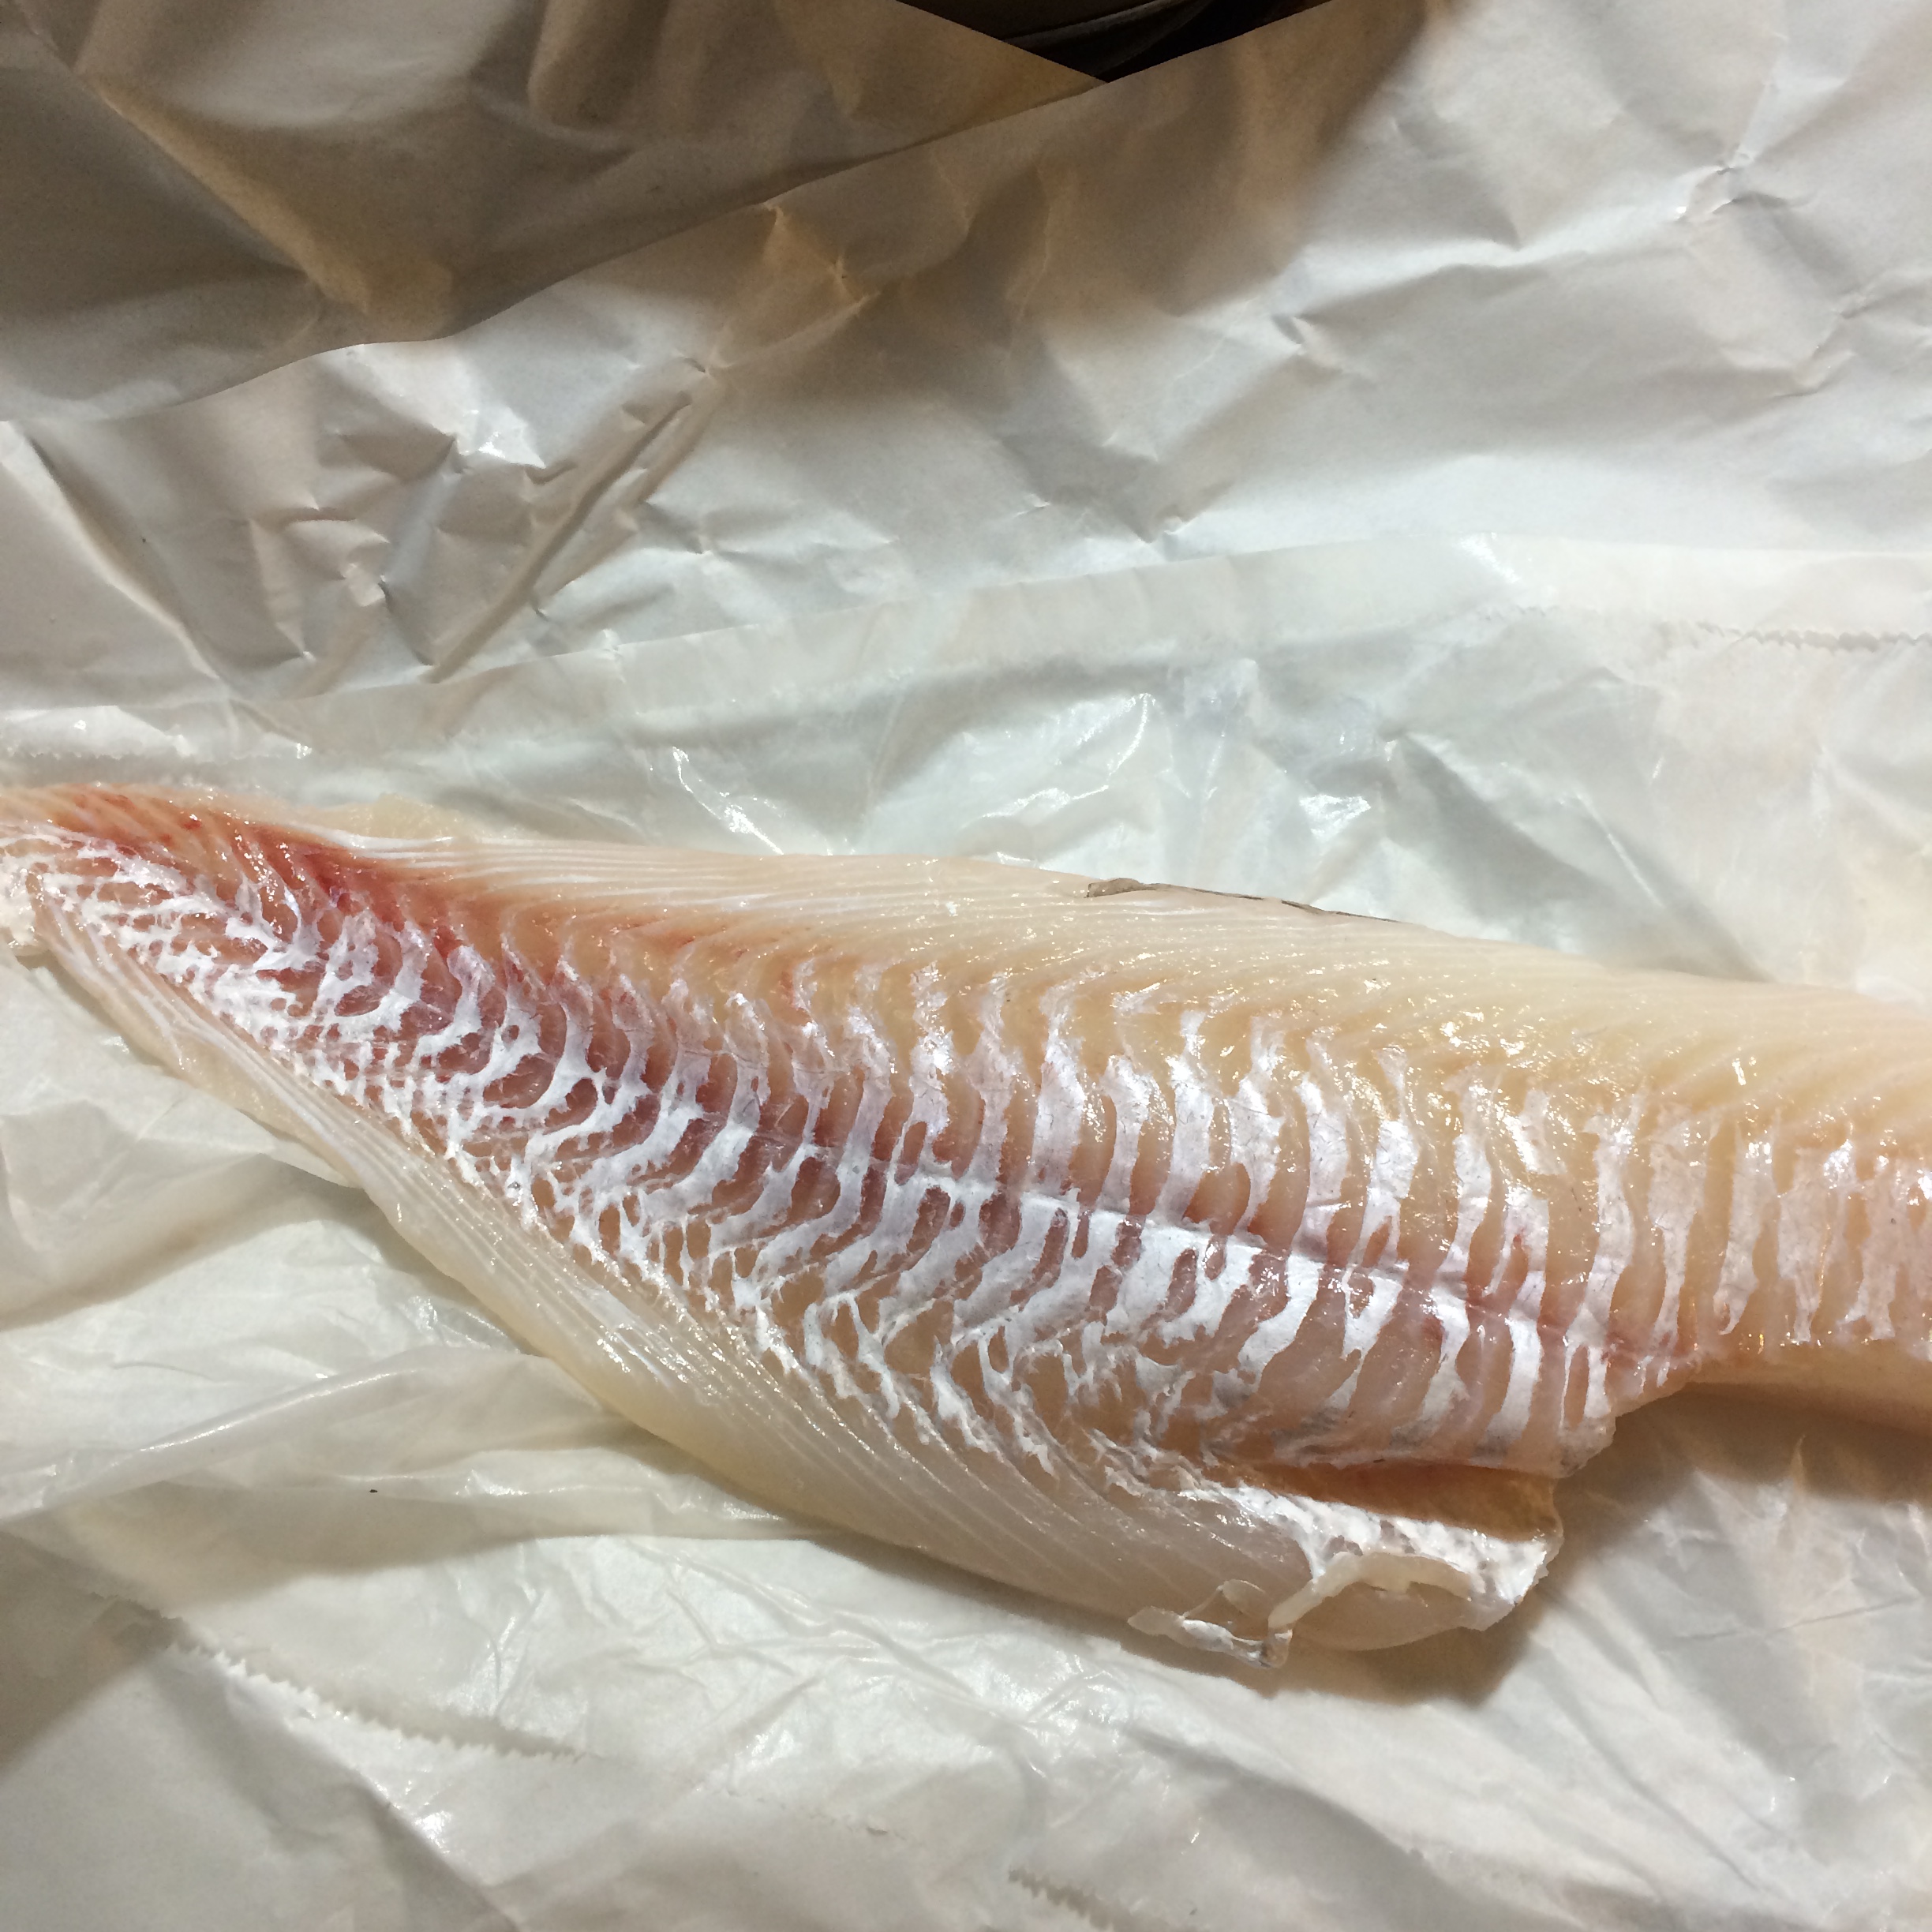
    • 1 lb Haddock or other white fish such as flounder or tilapia

What You Do:

Haddock (4)

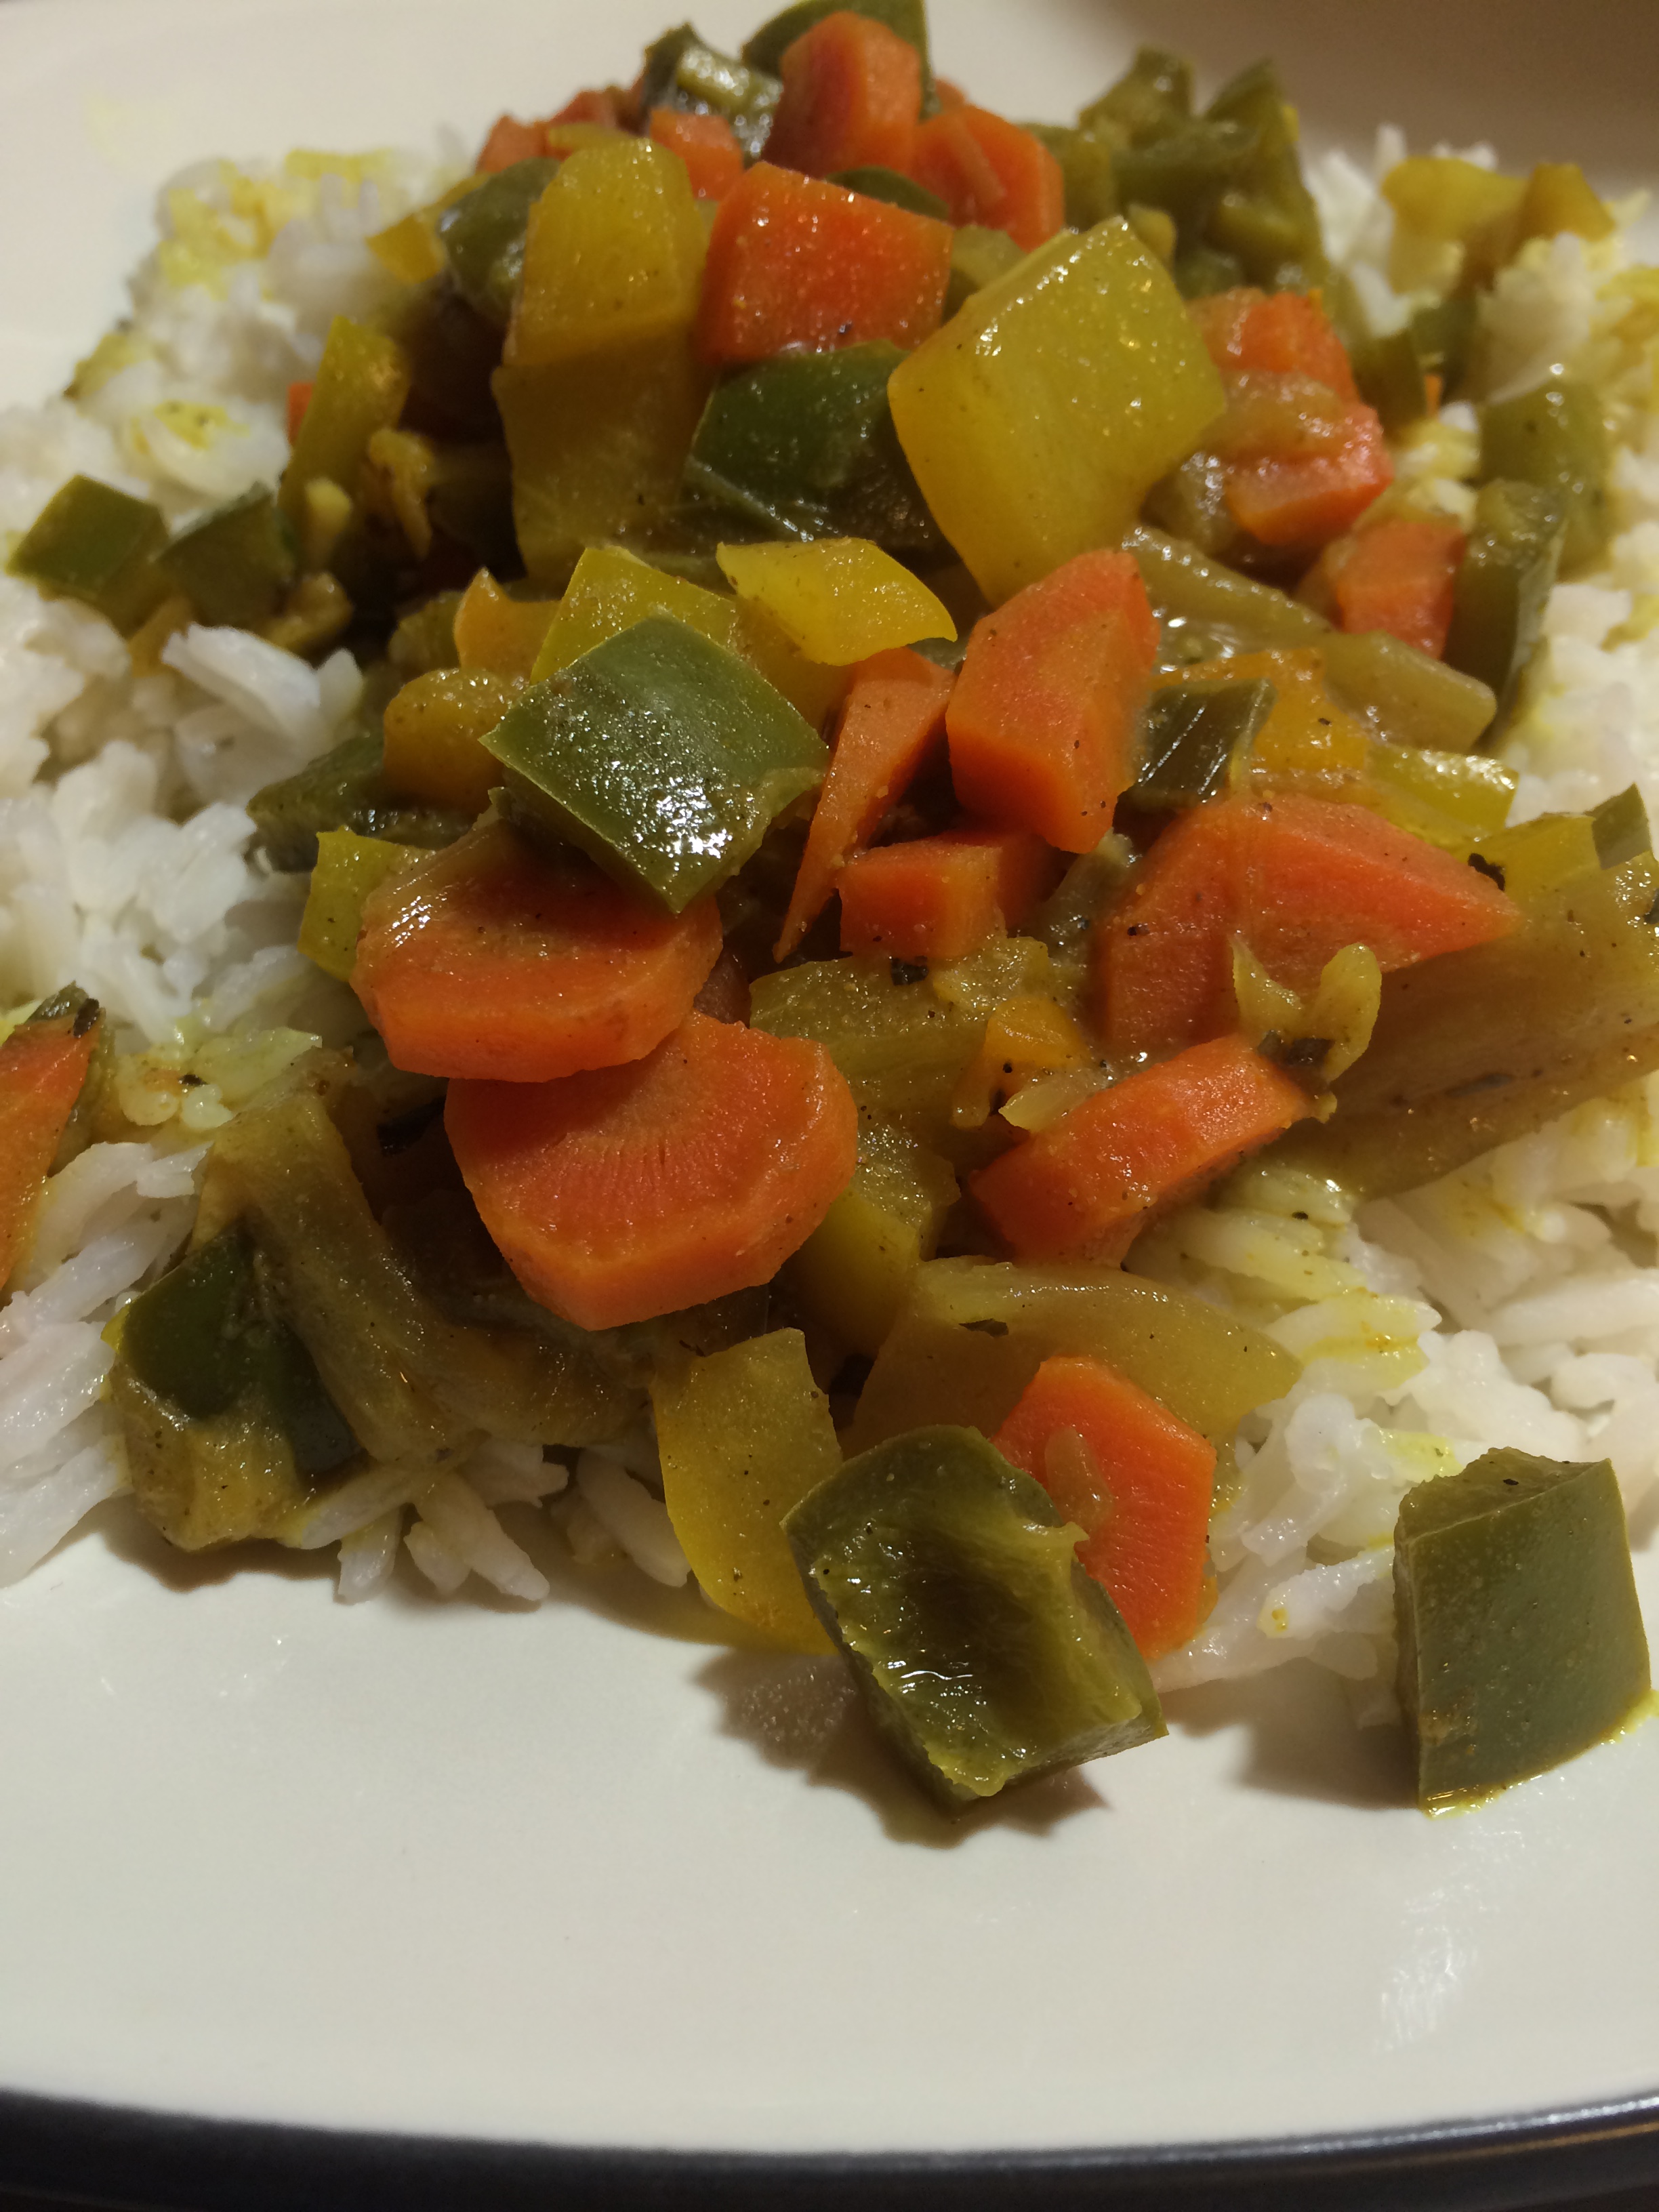
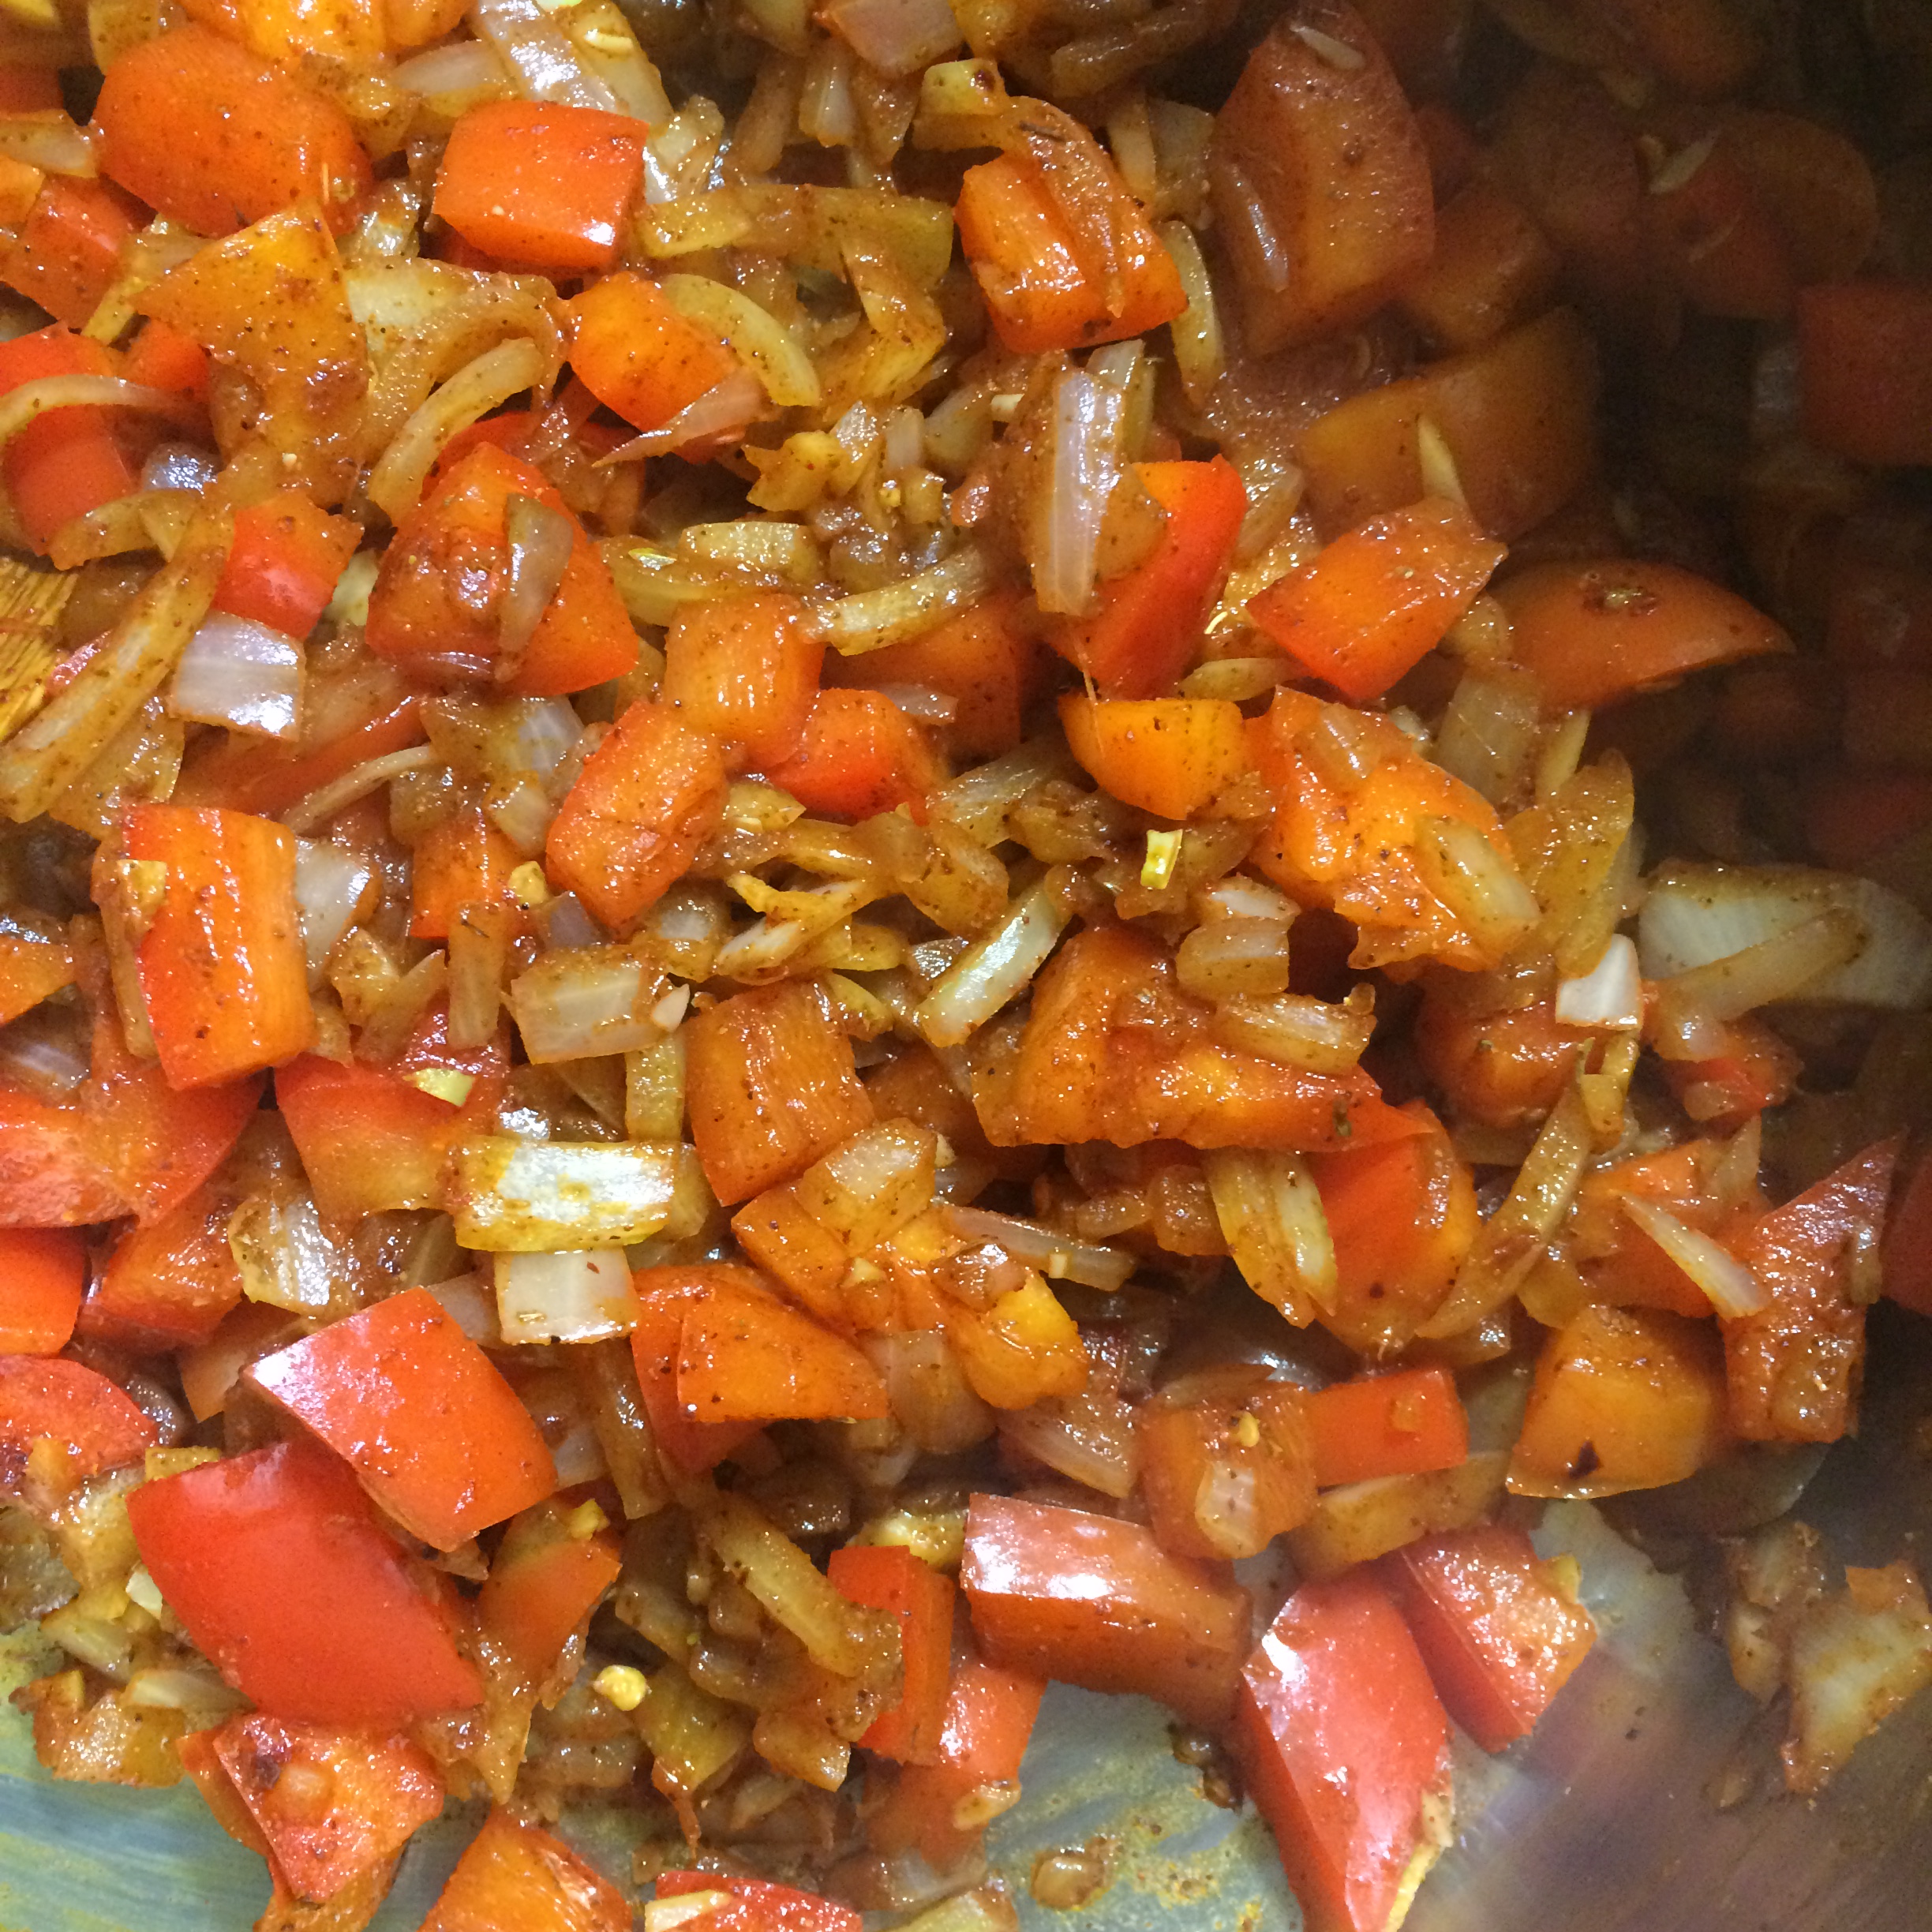
In a large, deep skillet with olive oil heated on medium, cook the onion and garlic until the onion is soft and translucent.

Add the peppers and white wine, cooking until just soft.

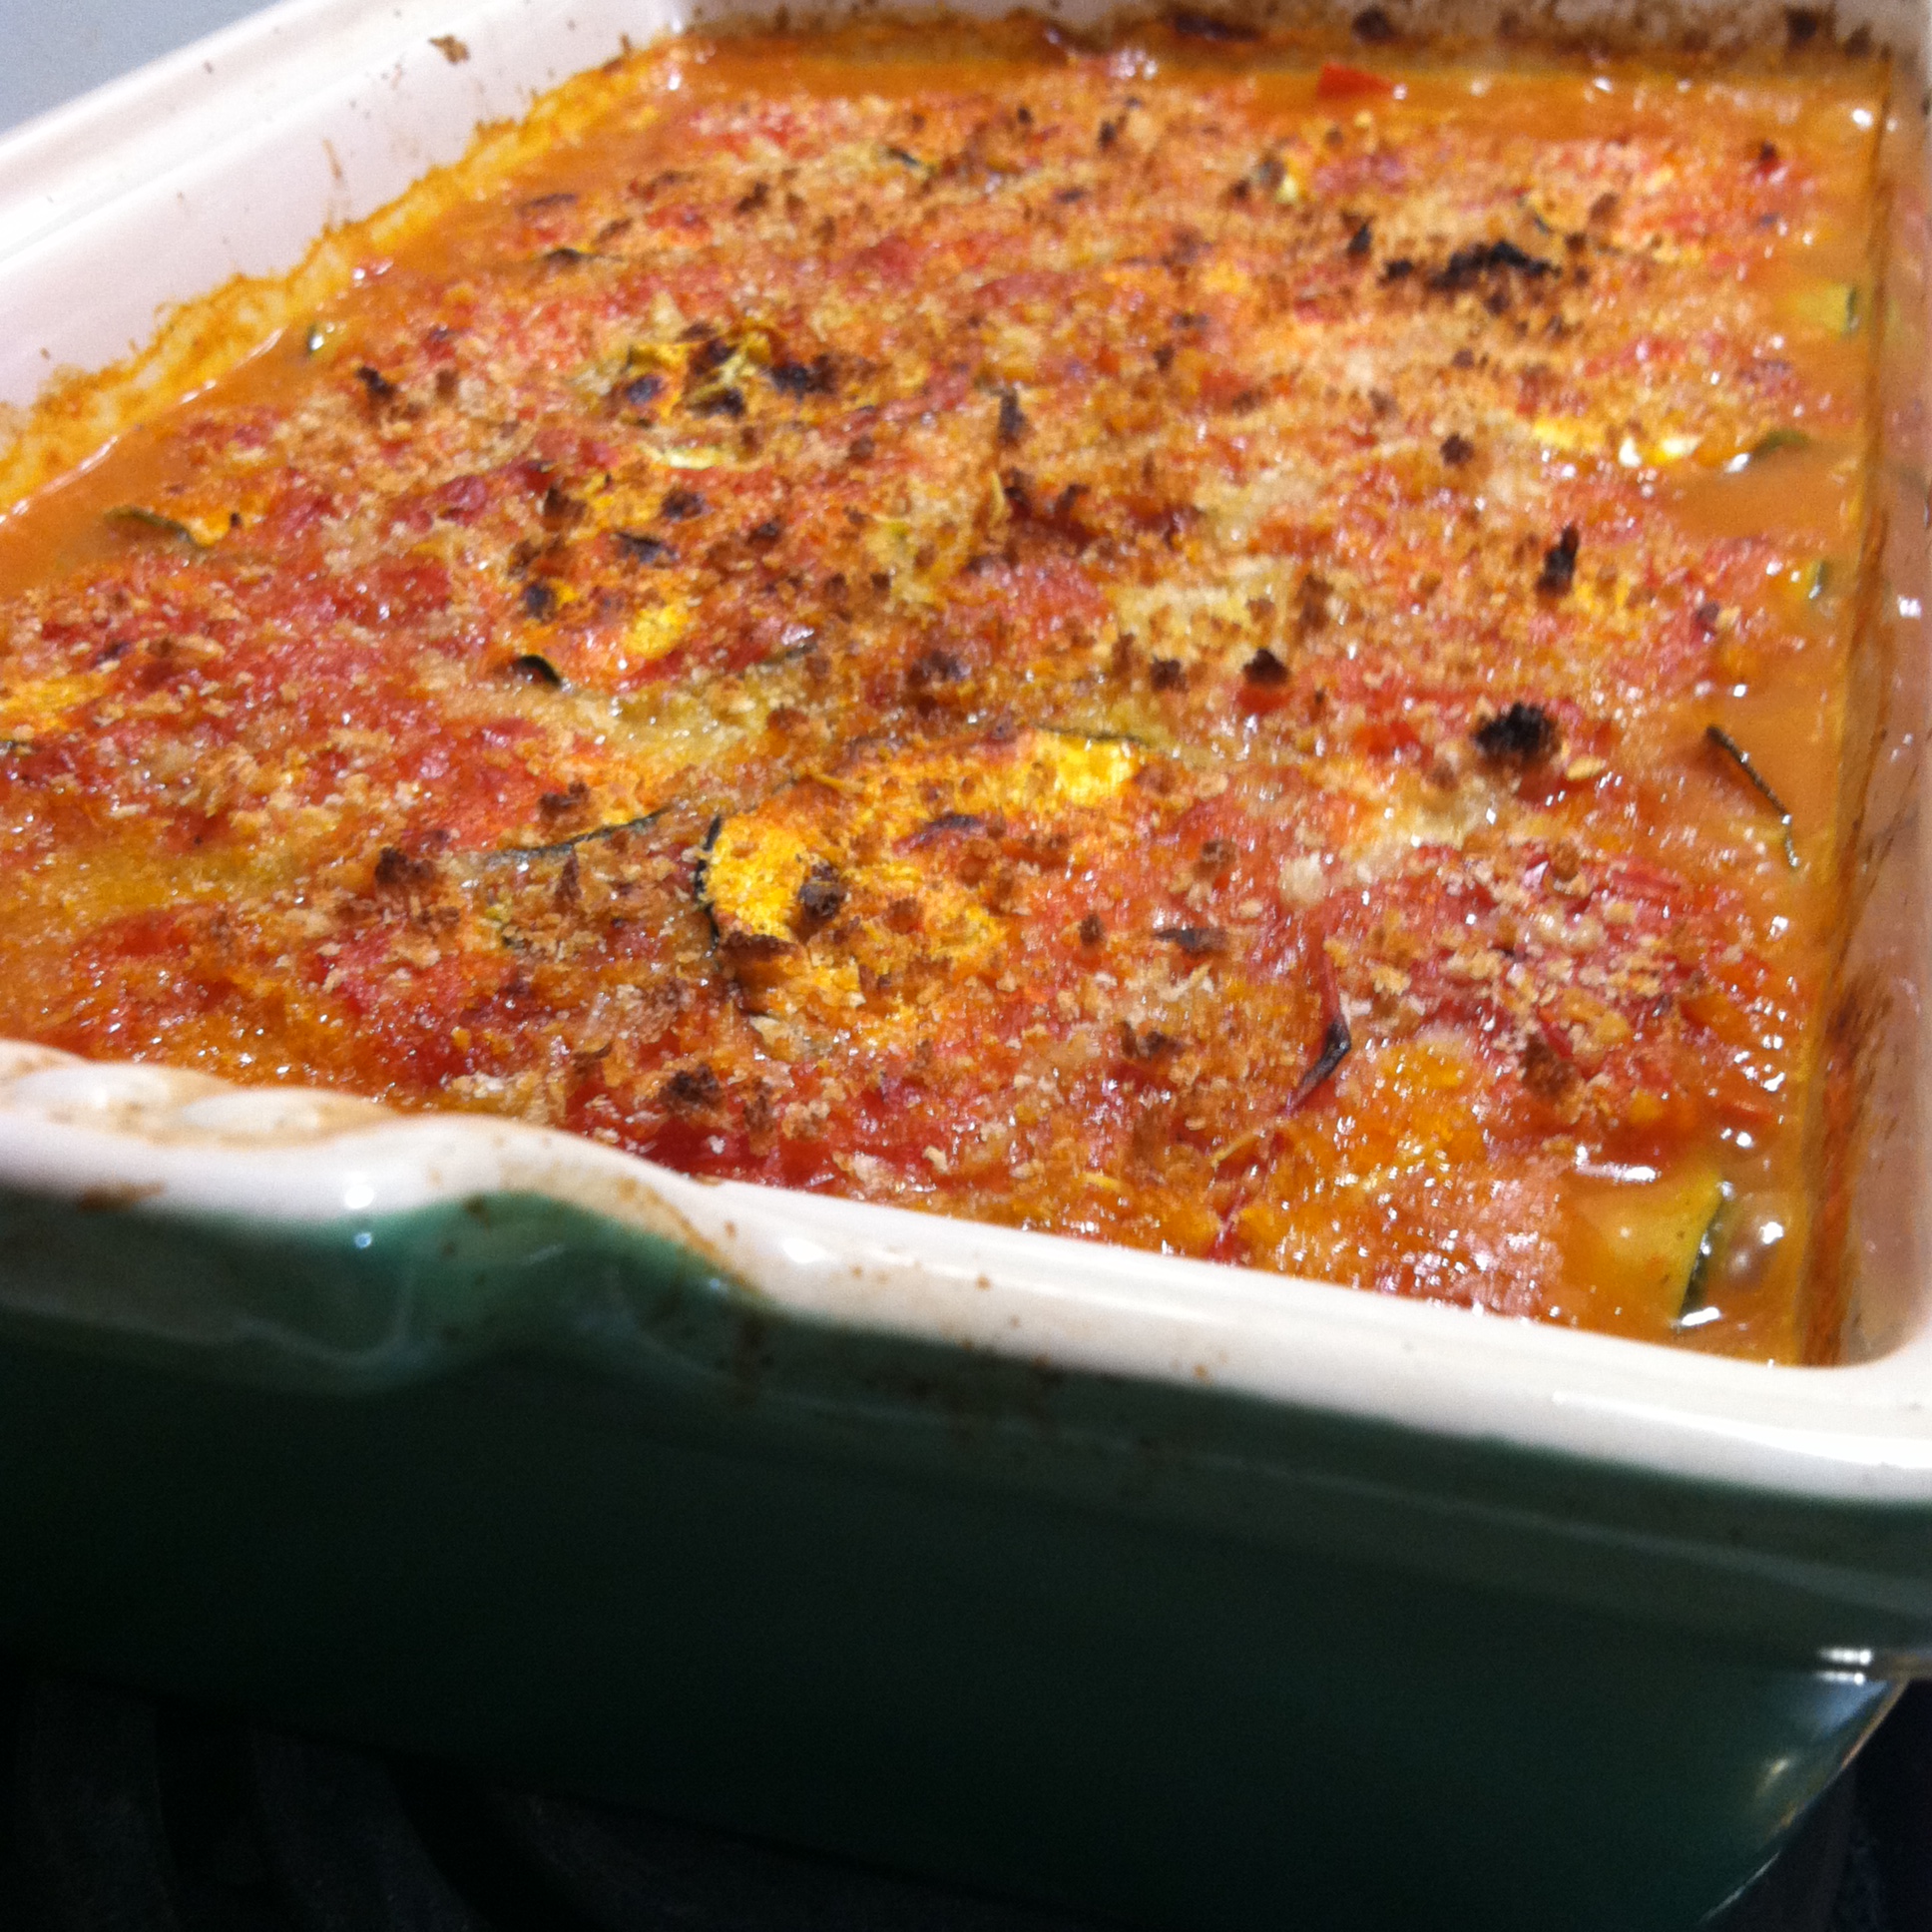
Add the tomatoes and Cajun spice and combine well.

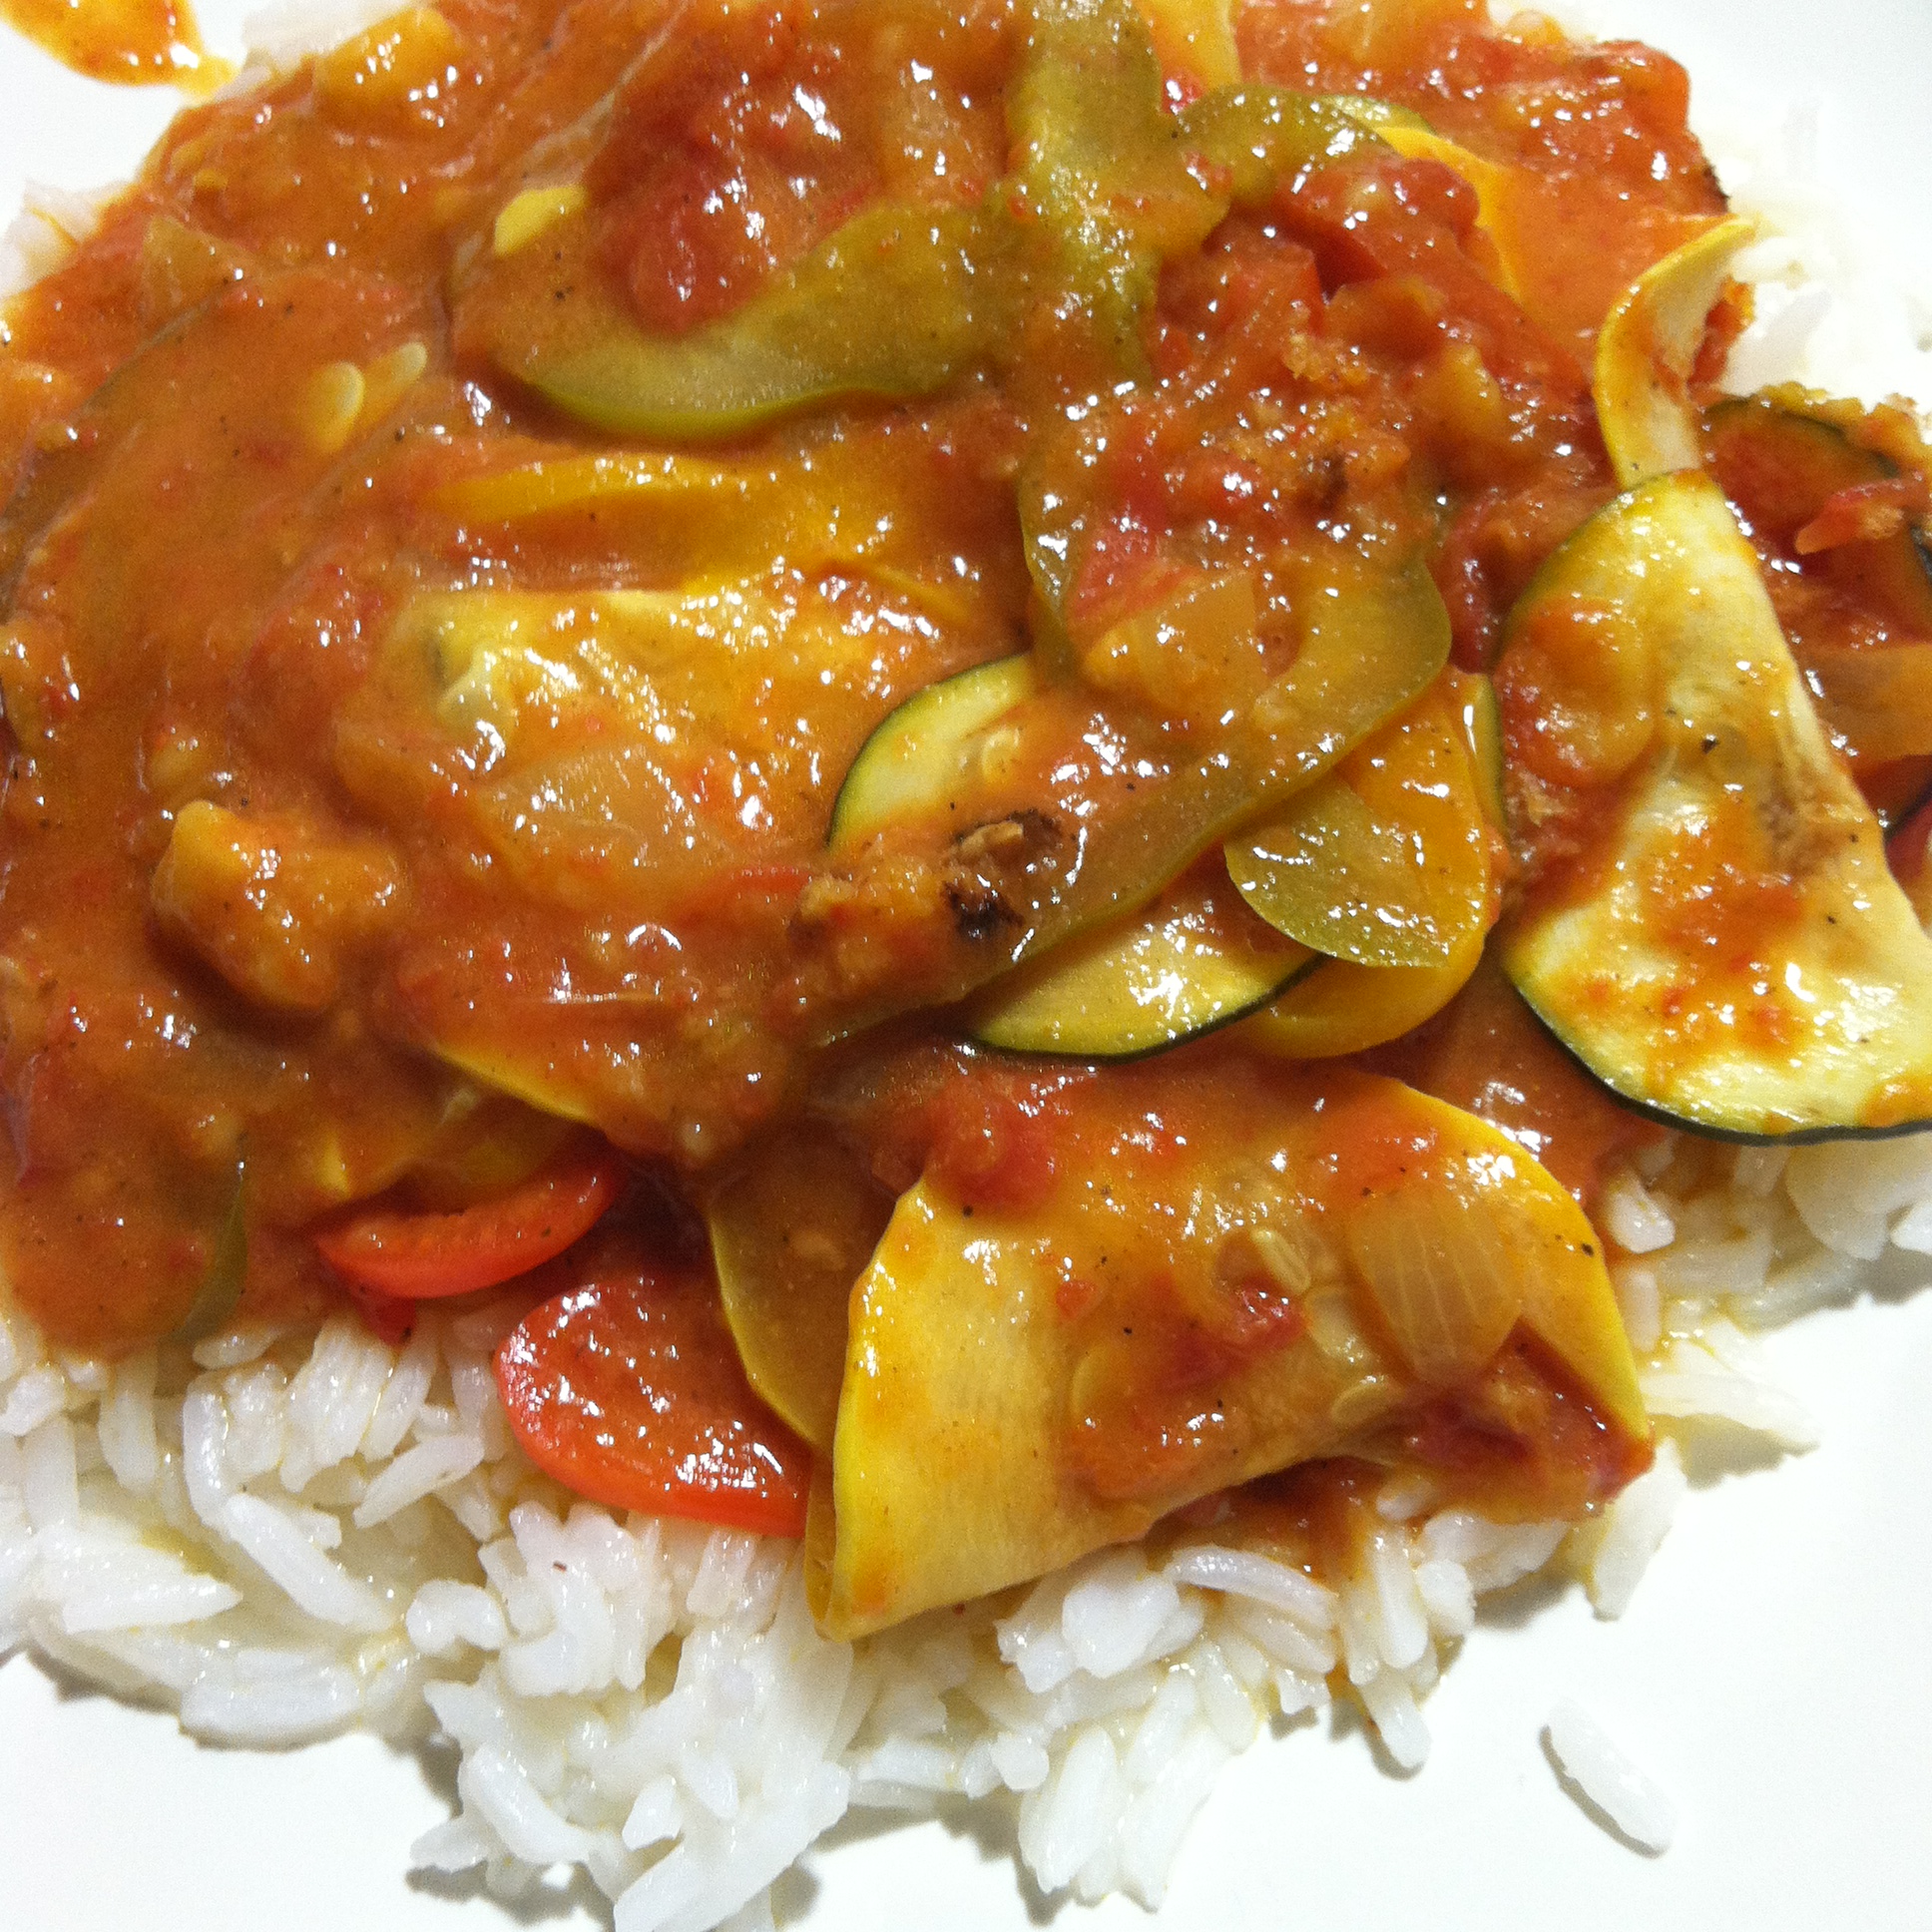
Place the haddock in the skillet with the tomato sauce, cover and let simmer for 5-8 minutes or until fish is fully cooked and flakes easily.

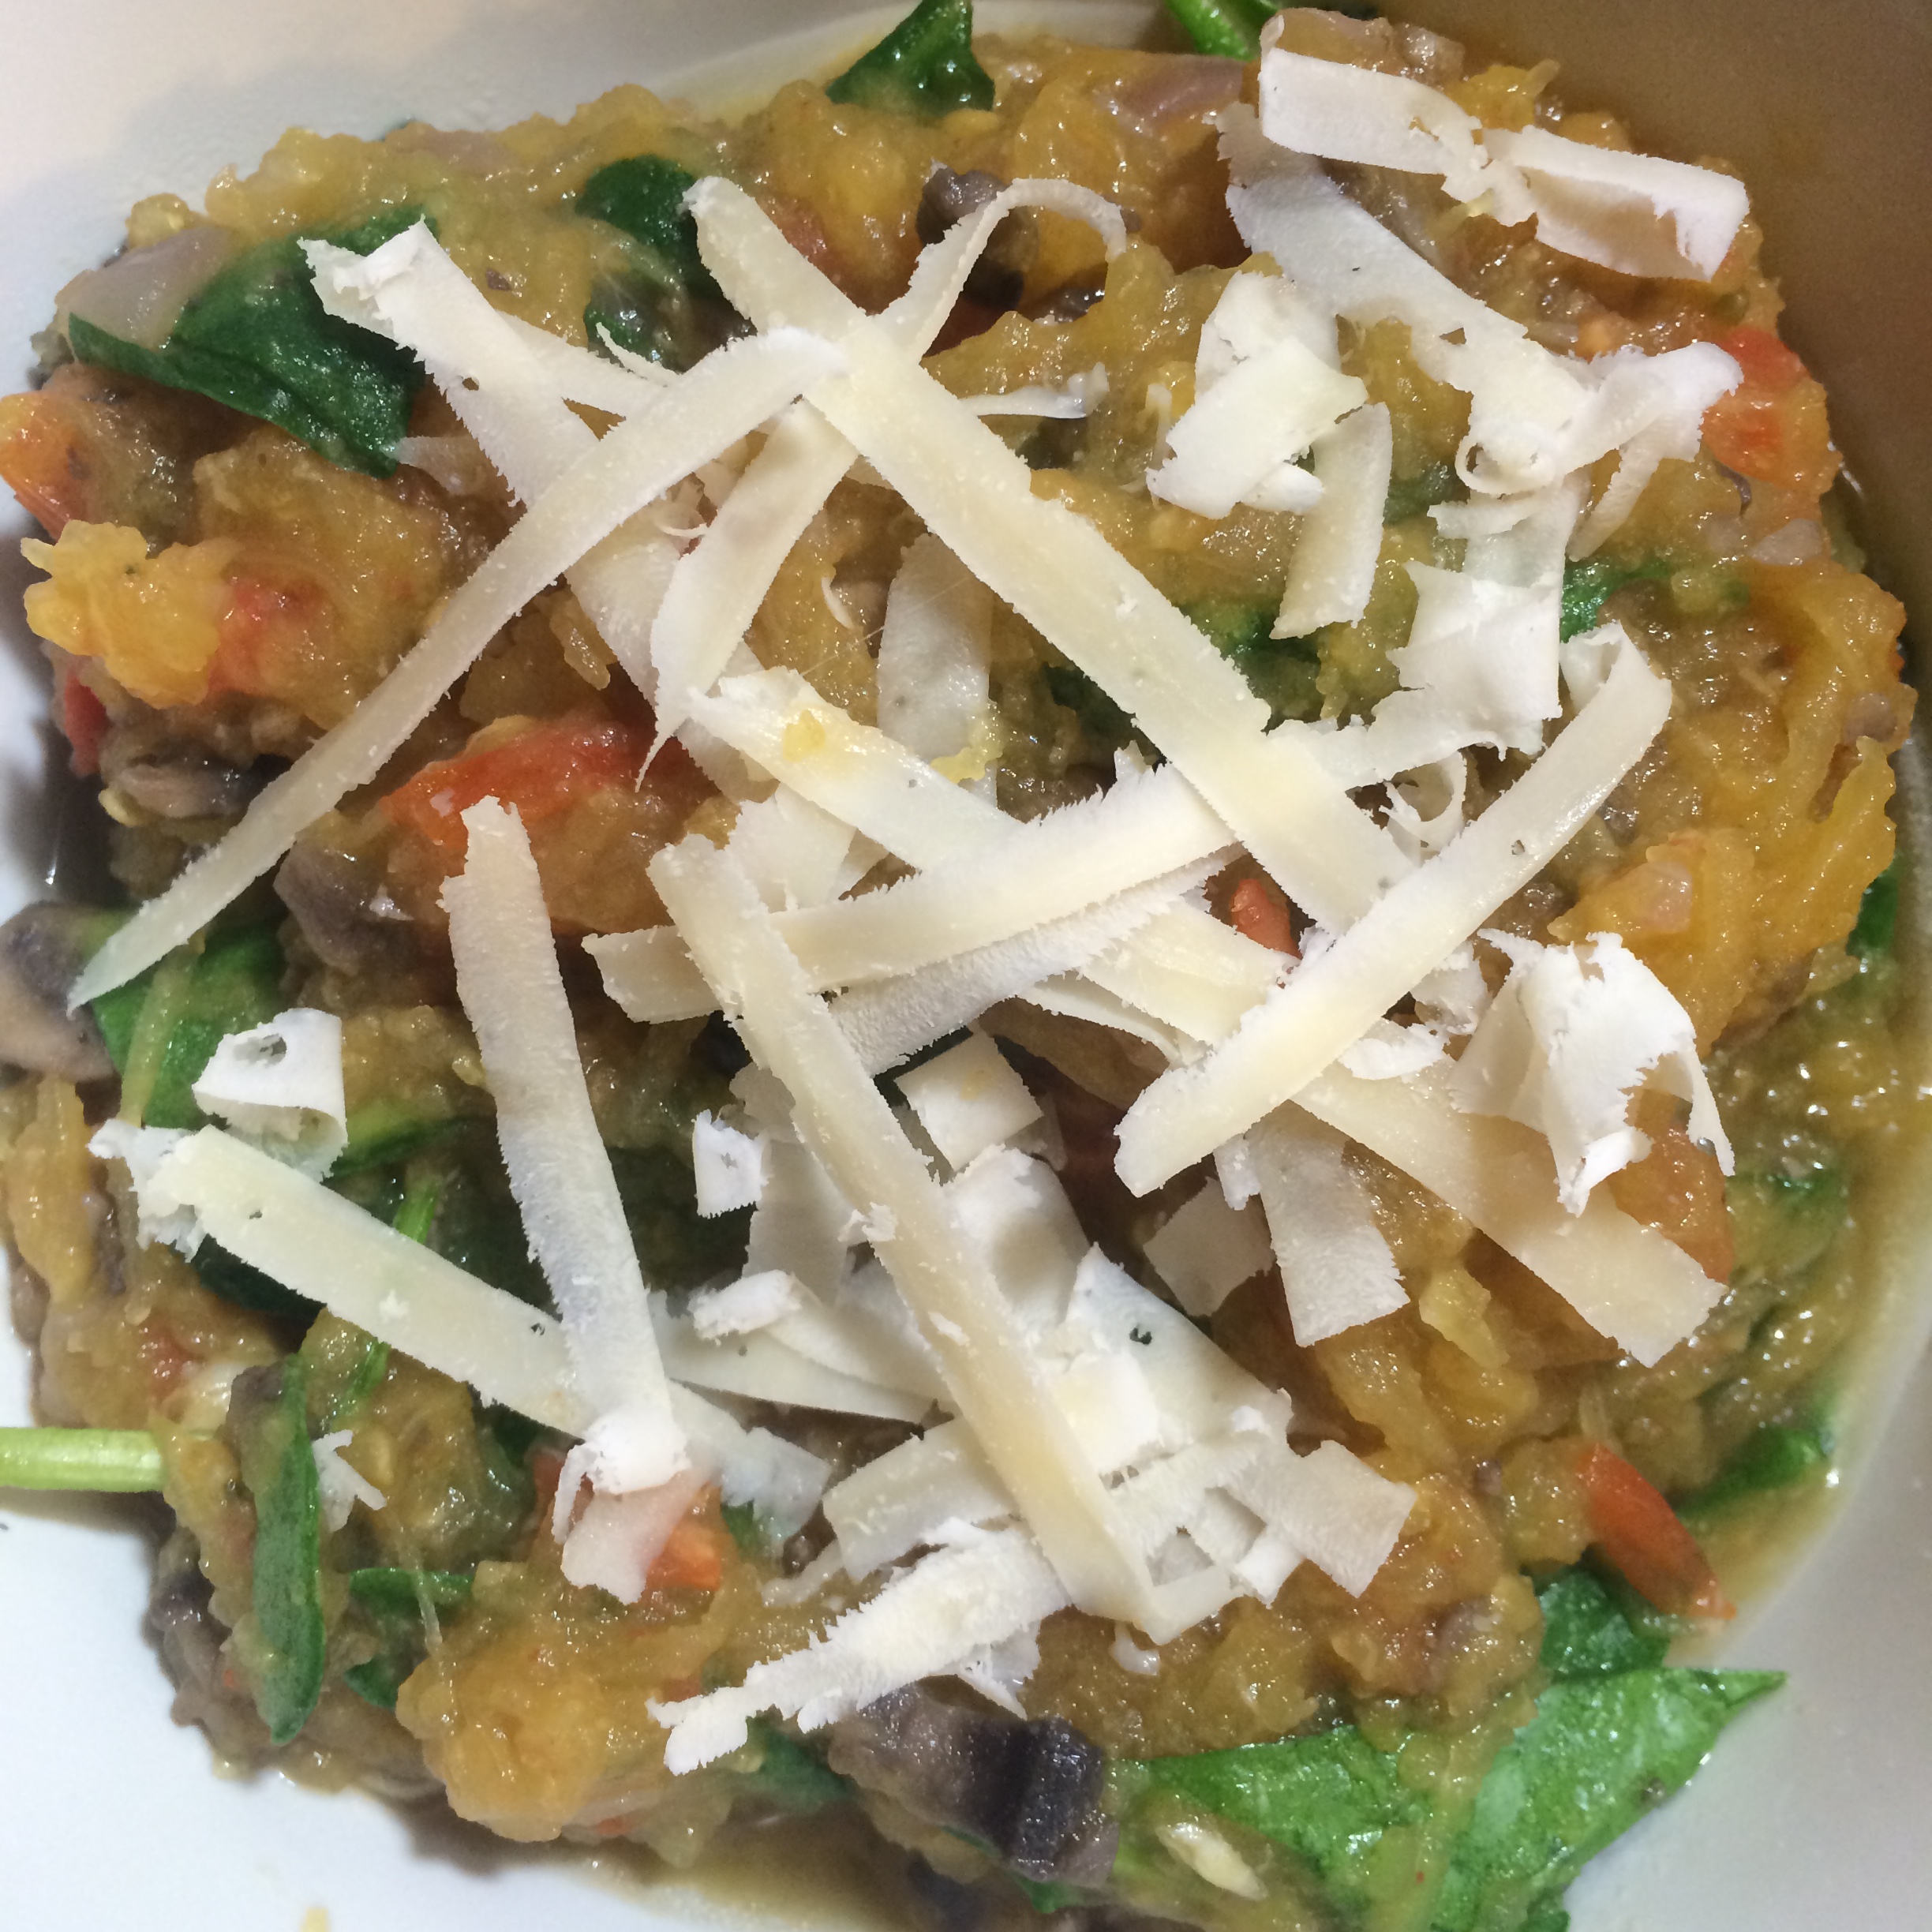
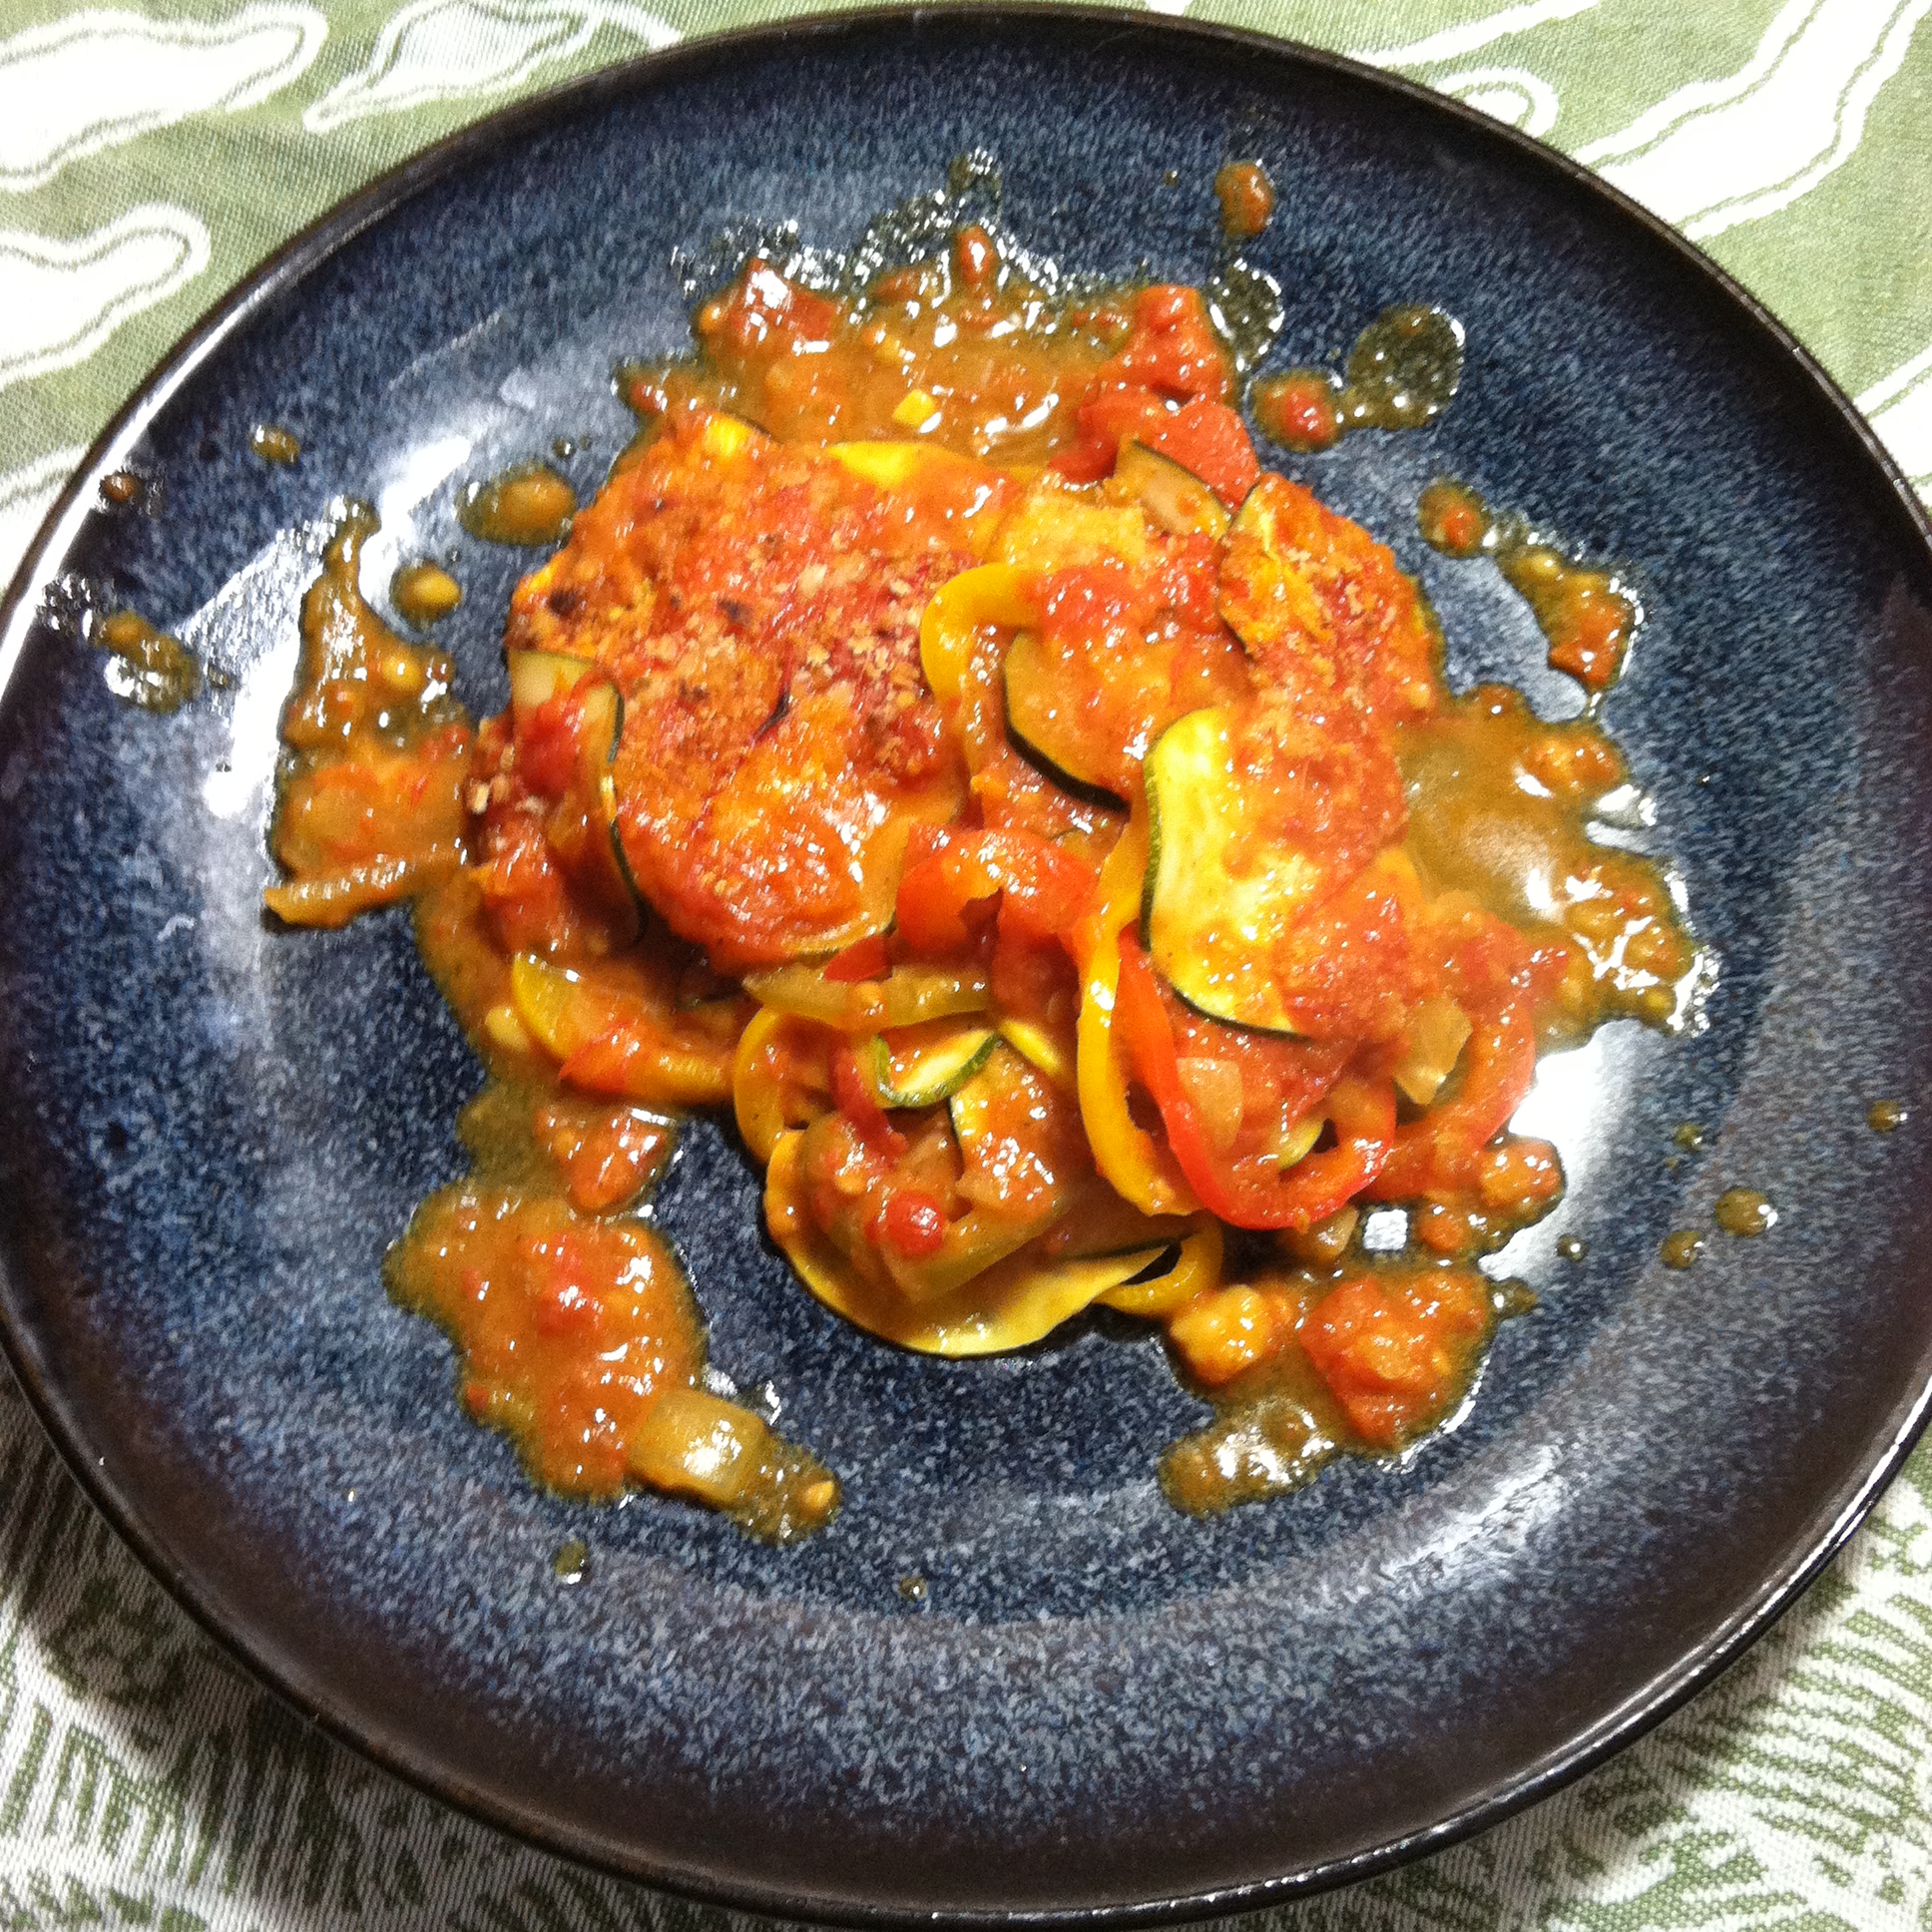
Then it’s ready to serve! Check out the whole plate – I also made raw shredded lemon Brussels sprouts that made one heck of a side dish. Stay tuned for that recipe later this week!

Haddock (11)

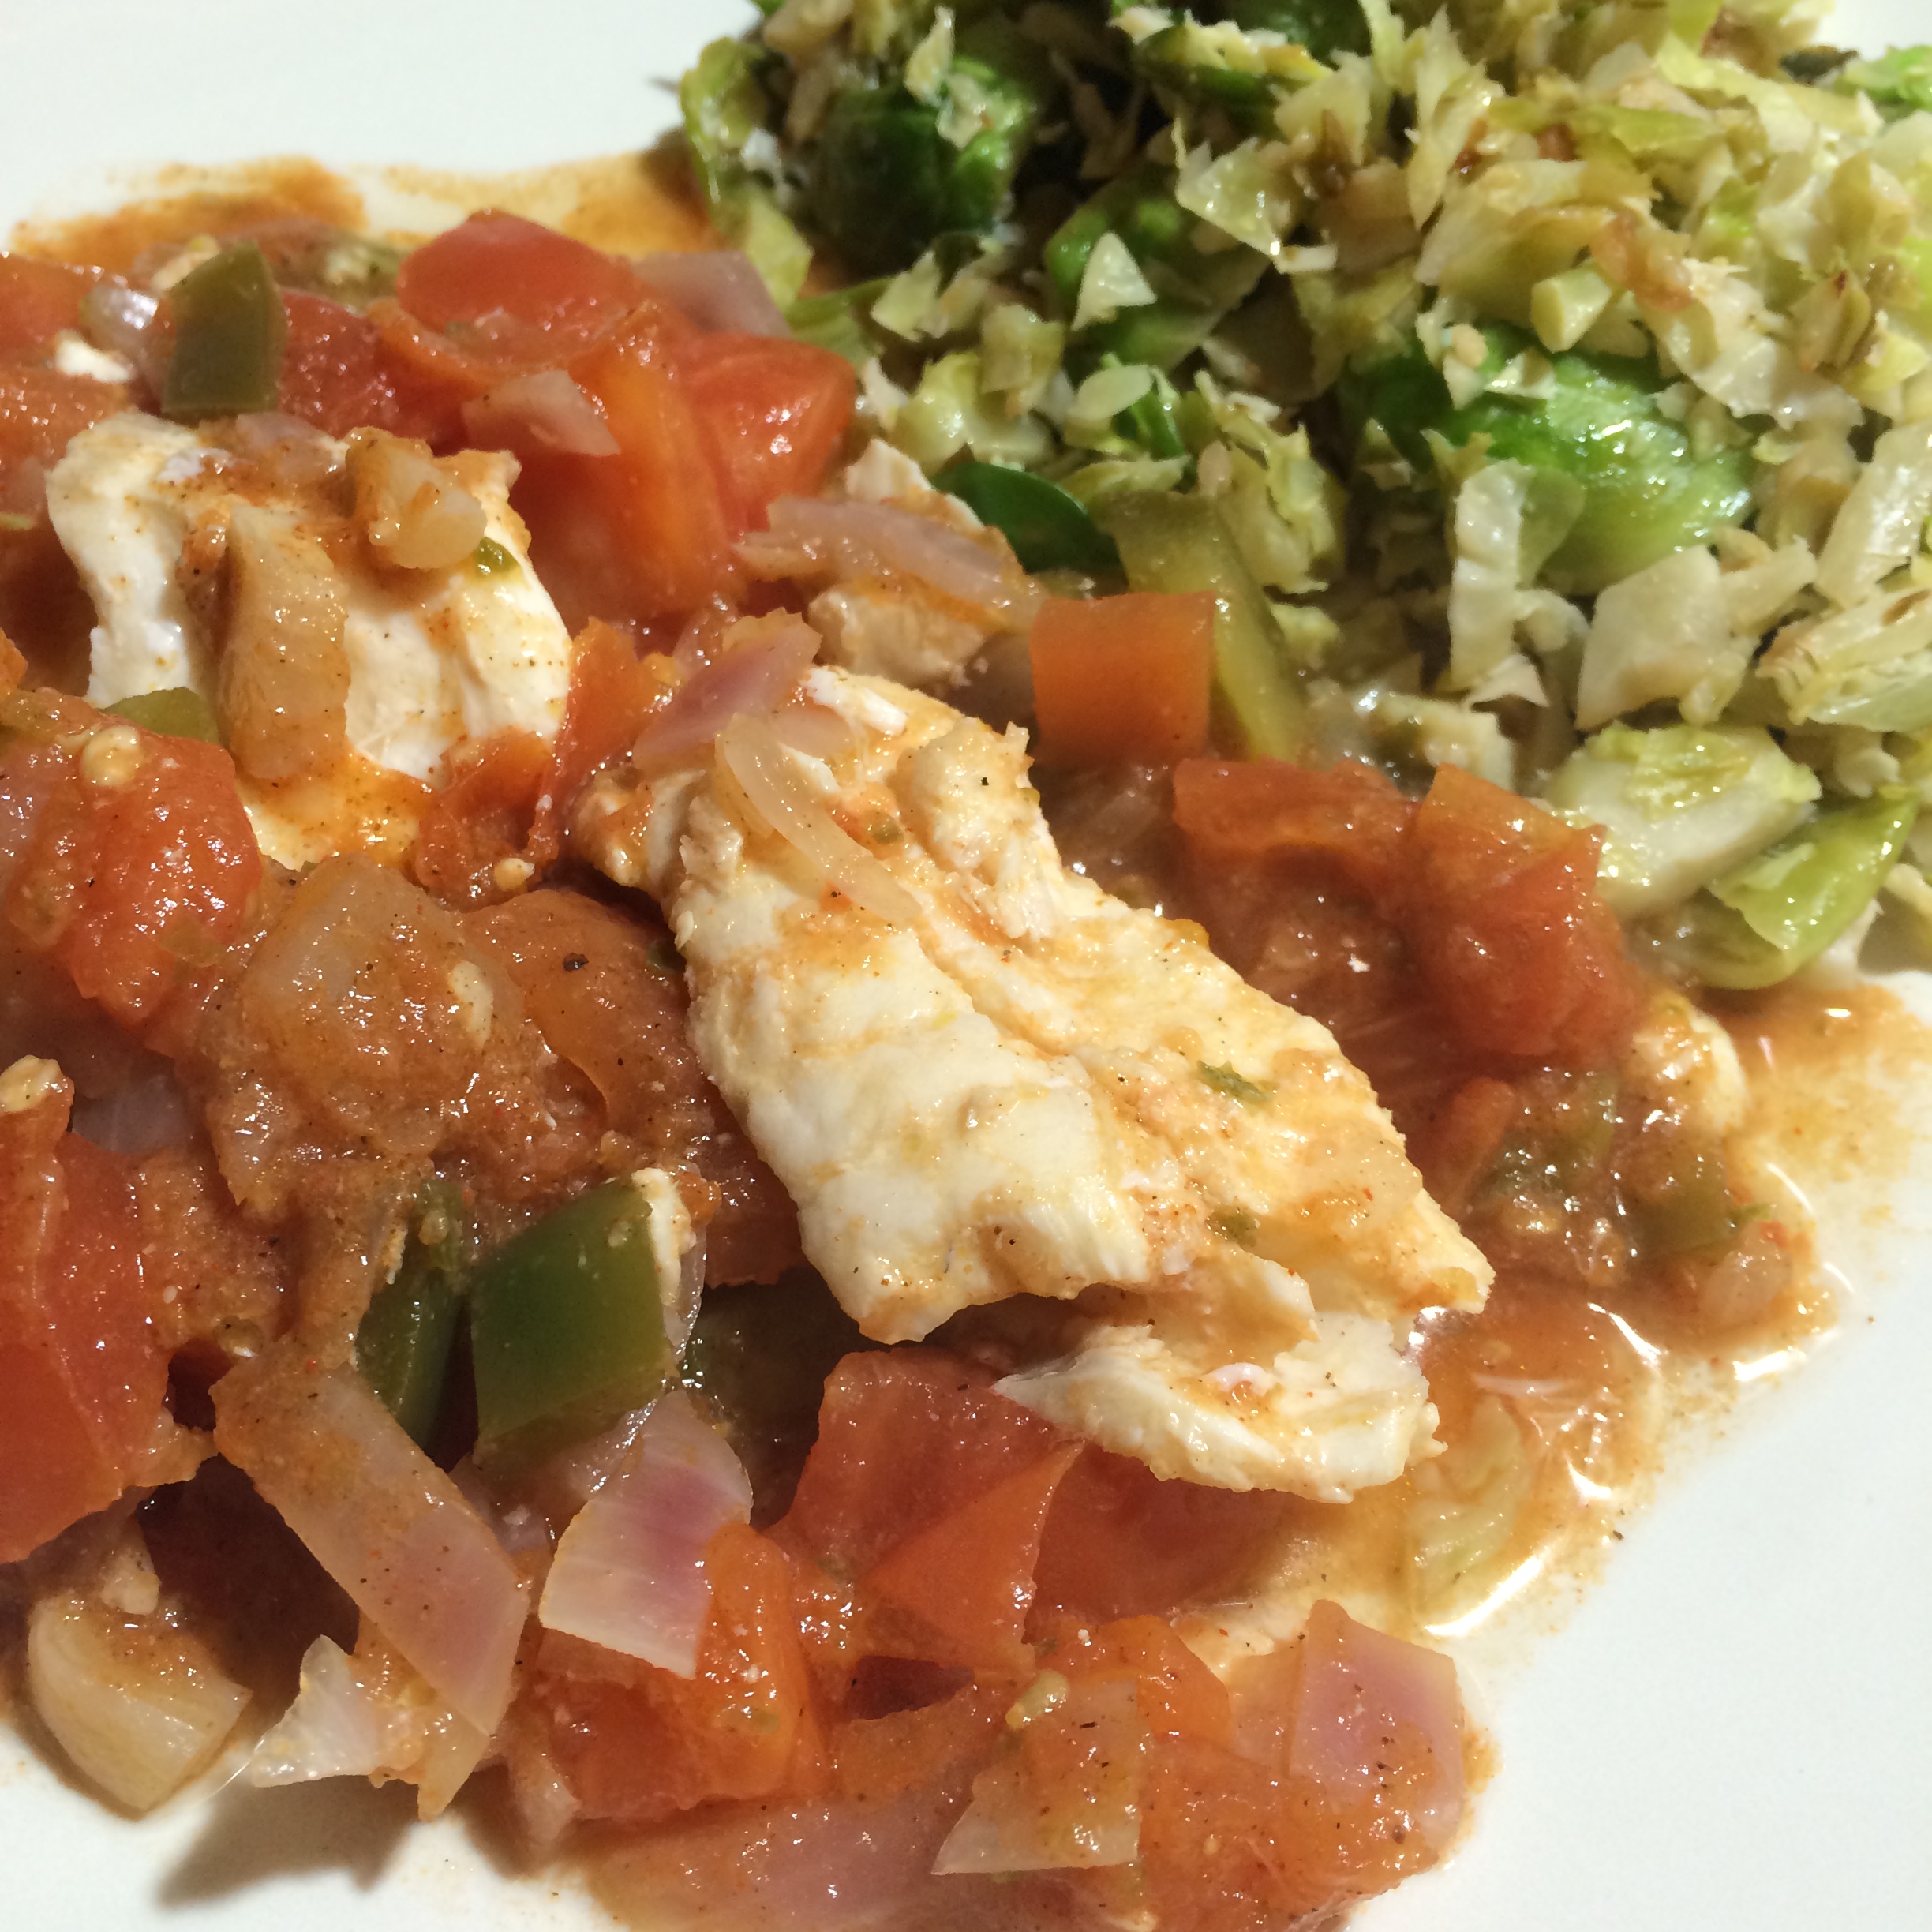
Pro Tip: This dish makes excellent leftovers, but be sure to eat it within 5 days 🙂


Advertisement

Cauliflower Cous Cous and Vegetables

Lightly adapted from the Nutritionista

I love making one food out of another, healthier food. Like making pasta out of vegetables, a pie crust out of quinoa or cous cous out of cauliflower.

Curry (6)

I actually hardly ever cook using cous cous. I’d rather use quinoa since it’s gluten free and healthier, but there is definitely something about the texture of cous cous that makes it pretty ideal for meals. That’s why I was thrilled to discover a cous cous recipe that didn’t call for cous cous at all. You can easily use cauliflower instead for an all-vegetarian and gluten free dish that is just. so. good.

Curry (1)

What You Need:

  • 1 head of cauliflower
  • 1 orange pepper, chopped
  • 3/4 cup cherry tomatoes, halved
  • 1 stalk celery, chopped (about 1/2 cup)
  • 2 tbsp fresh parsley, chopped
  • 2 tbsp lemon juice
  • 2 tbsp olive oil
  • 1 tsp black pepper
  • 1 tsp salt

What You Do:

Curry (4)

Gently pulse cauliflower in a food processor until it resembles a cous cous-like texture. If you don’t have a food processor, just finely chop the cauliflower with a sharp knife until it becomes very small pieces.

In a large bowl, mix the cauliflower with the remaining ingredients. Stir well and serve!

This makes a great side dish, and while it screams summer BBQ, it really works just fine any time of year with your favorite meat, as a filling for stuffed peppers (stay tuned for that recipe), or just mixed in with a salad. The lemon juice and oil make a nice dressing so you don’t have to add the extra calories. Put some avocado in with it and you’ve got yourself a fantastic meal!

Pro Tip: This is a great dish to play with as far as adding your favorite herbs. Add freshly chopped basil, oregano, mint or cilantro or even chopped walnuts or dates to give it some different flavor and texture!

Curry (7)

Coconut Vegetable Curry

We had a little bit of a water disaster at our house the other night. Two windowsills that need replacing decided they just couldn’t hold on anymore, and they made that decision during one of the longest and most torrential rainstorms the Seacoast has seen in a while.

Curry (11)

It turns out water had been dripping through the walls and into our basement all day, but Mike heroically made this discovery in the middle of my dinner prep/first glass of hard cider.

Needless to say, my goal of enjoying warm curry and rice in front of the fire while binging on nightime television was not realized. Instead, I held sheets of plastic through the open windows while Mike stood outside, bundled in rain gear, staple-gunning the plastic to our house with frozen fingers. Winter is fun.

So the photos for this dish aren’t great, and I let the whole pan burn at one point because I simply forgot I was cooking. But as long as you don’t discover a hole in your house during a rainstorm while you’re making this dish, you’ll be fine. And it still came out great for us, even if we wolfed it down at the table with zero regard to the actual taste. I’m looking forward to rediscovering it with the leftovers already.

Curry (13)

Also barring any major extraneous complications, this is a really easy dish to make. It looks like a lot of ingredients, but it’s mostly just spices.

What You Need:

  • 1 1/2 cups Basmati rice
  • 1 tbsp coconut oil
  • 1 medium sweet, yellow or red onion, sliced
  • 1 clove garlic, minced
  • 3 carrots, peeled and sliced into rounds
  • 1/4 cup white wine
  • 1 green bell pepper, chopped
  • 1 yellow bell pepper, chopped
  • 1/3 cup green onions, chopped
  • 3/4 cup vegetable broth
  • 1 can coconut milk (13.5oz)
  • 1 tsp freshly grated ginger
  • 1 tsp ground turmeric
  • 1 tsp ground cumin
  • 1 tsp dried basil leaves
  • 1/2 tsp freshly chopped sage
  • 2 tbsp curry powder

What You Do:

Cook the rice according to package directions and set aside, keeping warm.

While rice is cooking, heat coconut oil in a large skillet over medium heat.

Curry (9)

When oil is hot, add sliced onions and stir, sauteing for about 2 minutes or until they become soft and translucent.

Add the garlic, carrots and white wine, and cover, simmering until wine is evaporated.

Add the peppers and green onions and vegetable broth, mixing until well combined and cover, simmering, until vegetable broth has evaporated.

Add the coconut milk. Stir well for about a minute.

Add all spices and stir until well combined.

Serve the vegetable curry over a bed of warm Basmati rice.

Pro Tip: Don’t walk away from the dish while it’s simmering in white wine and/or vegetable broth for more than a couple minutes. It’s not afraid to burn.

Curry (10)

Tofu Honey Chili with Gluten Free Jalapeno Cornbread

So back in the day when I was a budding foodie, I had a food blog on Blogger called Two Peas in a Pot. I was pretty excited about it and posted quite a few recipes. Then I stopped keeping up with it as life got busier, and I let it fall into the great Internet abyss.

IMG_0400

However, I uncovered it recently thanks to Facebook alerting me to the fact that I hadn’t posted in awhile (5 years – thanks Facebook). Having advanced somewhat in the food blogging world at this point in my life, I got a good laugh about the amateurish quality of the food photos I had been posting with my recipes. The whole blog left a lot to be desired, but we all have to start somewhere, right? And the recipes themselves aren’t bad. This honey chili and cornbread is an adaptation of a recipe I had posted on my old blog. However, for comparison’s sake, here’s the photo of this dish that I originally took:

Chili

Appetizing, right? It’s nice that my hand is in the shot, and I’m also pretty sure I had already taken a bite out of that cornbread before snapping this photo. Mike definitely chuckled when I showed him – thank goodness I’ve improved my food photography at least marginally since my old blogging days.

IMG_0399

But like I said, the recipes aren’t bad. As soon as I came across the honey chili and jalapeno cornbread, I wanted to make it again and see what I could do with it. And honey chili 2.0 has come out fabulously. I love making dinners like this because of the leftovers and because they’re basically just super easy but pack a healthy and filling punch. Plus, this entire meal is 100% gluten free. Even the cornbread. (Honestly for something made primarily of corn you would think it would always be gluten free, but it’s not).

IMG_0394

What You Need for the Chili:

  • 1-14oz package firm tofu
  • 1 tbsp coconut or olive oil
  • 1 cup chopped onion
  • 3/4 cup chopped bell pepper
  • 2 cloves garlic, finely chopped
  • 12 oz can diced tomatoes (or chop 1 1/2 cup fresh tomatoes)
  • 12 oz can black beans, drained and rinsed
  • 12 oz can kidney beans, drained and rinsed
  • 2 tbsp chili powder
  • 1 tsp. ground cumin
  • 1/2 tsp. salt
  • 1 tsp. dried oregano
  • 1 tsp. crushed red pepper flakes
  • 2 tbsp honey
  • 2 tbsp. red wine vinegar
  • 1/4 cup freshly grated cheddar cheese

IMG_0382

What You Need for the Cornbread (adapted from GlutenFreeOnAShoestring):

  • 2 cups coarsely ground yellow cornmeal
  • 1 teaspoon kosher salt
  • 1 teaspoon baking soda
  • 2 teaspoons baking powder
  • 1 egg
  • 4 tablespoons unsalted butter, melted
  • 1 1/2 cups plain Greek yogurt*
  • 4 tablespoons honey
  • 2 jalapenos, finely chopped (seeded if desired)

What You Do:

Preheat oven to 400F

IMG_0375

Before doing anything, shred the tofu into a strainer using a cheese grater. This will help remove excess water from the tofu and you can set it aside to drain while you cook.

Make the cornbread first, as you can make the rest of the dish while it bakes.

In a small bowl, whisk together the cornmeal through baking powder.

In a separate bowl, mix together the remaining ingredients, including jalapenos.

Add dry ingredients to the wet mixture and mix well. The batter will be fairly fluffy in texture.

IMG_0387

Scrape batter into a well-greased 8-or-9-inch baking pan. I used a round cake pan.

Bake for 20 minutes. The top of the cornbread will be a lovely golden brown and the bread is done when a toothpick inserted in the middle comes out clean.

While the cornbread is baking, heat oil in a large skillet. Add the onion, bell pepper and garlic and saute until soft.

Add the tomatoes and beans and mix well, stirring occasionally until well heated. Then add the spices, honey and vinegar and mix well.

IMG_0391          IMG_0398

Finally, add in the shredded tofu and mix well. The cool thing about this dish is that the shredded tofu adds a hearty meat-like look and feel while keeping it 100% vegetarian.

Serve with a slice of cornbread and a sprinkling of cheddar cheese.

*Pro Tip: Don’t have plain Greek yogurt on hand for the cornbread? Substitute with an equal amount of sour cream or buttermilk.

IMG_0401

Baked Spaghetti Squash and Vegetables

Whenever Mike and I return from a holiday weekend, we inevitably feel totally stuffed (even if our last big meal was the day before) and guilty from all the treats and goodies we tossed freely into our mouths. And yet somehow we still manage to cram leftovers down our throats.

IMG_0367

When we returned on Sunday from our whirlwind Thanksgiving holiday in Connecticut and New York, I gave myself one last hurrah meal. I indulged with a bagel pizza I made using a New York bagel we heisted from Mike’s aunt’s house before heading out. There is just something so special about these bagels. It’s rumored to be the water used in the dough, which is apparently unique to the Empire State. Whatever it is, I had no choice but to say a tearful farewell to these bagels and what had been turning into a dangerous daily breakfast habit.

IMG_0370

Enter the spaghetti squash. Low in calories and sugar but high in nutrition and taste, there is no better way to reverse the holiday binge than with spaghetti squash. I typically prefer to prepare these as though it is actual pasta, and slather it with homemade tomato sauce and cheese, but given the circumstances I thought a lighter meal would be better. And this dish certainly is light. It really helped start our week off on the right foot.

IMG_0373

What You Need:

  • 1 spaghetti squash (about 5 cups cooked)
  • 1 tbsp coconut oil
  • 1 yellow onion, diced
  • 2 cloves garlic, minced
  • 1 jalapeno (seeded if desired)
  • 4 or 5 large white button mushrooms, chopped (about 1 cup)
  • 1 1/2 cups vegetable broth, divided*
  • 1 tbsp fresh sage, finely chopped
  • 6-10 Campari Tomatoes, cut into quarters (juices should be kept and added to dish)
  • 2 cups fresh baby spinach, uncooked
  • 1/4 cup freshly grated Parmesan cheese

What You Do:

Preheat oven to 400F

*Because this recipe calls for vegetable broth, you have the option to simply make your own. Boil 2 1/2 cups water in a pasta pot and add any parts of the vegetables from this recipe that you’re discarding. (Onion and garlic skin, mushroom stems, a few springs of sage, jalapeno stem and any unused parts of the tomatoes). Once you have boiled down the vegetables, strain the broth into a separate pot and set aside.

IMG_0357

Halve the spaghetti squash with a sharp knife. Dig out the seeds with a spoon and place squash face-down on a foil-lined baking sheet.

Bake for 30-45 minutes or until the squash skin becomes darkened and the squash begins to caramelize around the edges. If you can easily stick a fork through the skin and squash meat, you’re good to go.

While the squash is baking, heat coconut oil in a large skillet on medium heat. Add onions and garlic and saute until translucent and soft. Add chopped mushrooms and jalapenos, heating continuously until the mushrooms are brown, soft and fragrant. The mushrooms will emit some water, so let the entire dish simmer for about 10 minutes, stirring frequently.

IMG_0360

Once the water begins burning off, add one cup vegetable broth and stir. The heat should still be on medium and the broth simmering. Once it has simmered down to less liquid, add the sage and tomatoes with their juices. Continue to simmer.

Using a fork, remove the strands of spaghetti squash from the shell. You should have about 5 cups. Add it to the vegetable mixture and mix everything up well.

Add the remaining 1/2 cup vegetable broth (if you made your own, simply freeze any leftover broth for another dish).

Add the spinach and mix until it becomes limp and blends into the dish.

Top each serving with a sprinkling of Parmesan cheese.

IMG_0354     IMG_0355     IMG_0351

Pro Tip: If you have extra time, pile the whole deal into a baking dish, sprinkle with the cheese and bake on 350F for about 10 minutes or until cheese is melted.

Thanksgiving Day 4: Vegetarian Stuffing Stuffed Mushrooms

If a mushroom is stuffed with stuffing, is it redundant to call it a stuffing stuffed mushroom?

Stuffing (16)

Say that 5 times fast! Either way, the real point here is that stuffing is one of the greatest foods served at the Thanksgiving table. I know I have my whole affinity for squash thing going on, but it’s basically trumped by stuffing.  Stuffing is always flavorful and goes so well with all the other foods on your plate – especially the turkey. Even the name stuffing just makes me love it that much more.

Stuffing is mostly always served in a big bowl, but for the purpose of my 5-day Thanksgiving meal extravaganza (I’m calling it that now, by the way) I wanted to come up with something that would act as more of an appetizer, and be friendly to those traveling who want to bring something unique that can be easily heated up.

Stuffing (14)

This dish is a fun twist on the classic stuffing in a bowl. And it’s really easy to make. It may look like a staggering amount of ingredients but it’s actually very simple. It does include a homemade vegetable broth so you could always make things easier on yourself and use a store-bought kind. There’s 4 ingredients off the list right there!

And this recipe has some great vegetables in it that add amazing flavors so you don’t need to add spices outside of a pinch of salt and pepper.

Stuffing (1)

What You Need:

  • 2 leeks, one cut in half and one diced
  • 1 large yellow onion cut in half, one half left in tact (skins and all) and one peeled and diced
  • 1/2 a tomato
  • 1 jalapeno cut in half
  • 1 stick unsalted butter
  • 1 large parsnip, peeled and diced into cubes
  • 2 leeks, one cut in half and one diced
  • 1/2 large yellow onion, diced
  • 2 cloves garlic, minced
  • 1 medium eggplant, peeled and diced into cubes
  • 2 cups vegetable broth, divided
  • 1 medium sized load of French bread (about 3.5-4oz in weight) OR your favorite gluten free bread to make this a 100% GF dish
  • 1 tbsp fresh chopped sage
  • 1/2 tbsp fresh chopped rosemary
  • 5 large portobello mushrooms
  • 4 tbsp freshly grated Parmesan cheese
  • A pinch of salt and pepper

Stuffing (5)

What You Do:

Preheat oven to 350F

In a large saucepan, bring 6 cups of water to a boil. This is for your vegetable broth. Once the water is boiling, add the leek that is cut in half, the 1/2 tomato, the in-tact onion half and the jalapeno and boil until the vegetables are soft and the water is colored with vegetable leavings.

Strain the broth into a separate pot to separate out the vegetables. Discard the vegetables and set 2 cups of the broth aside. (Freeze the rest for future recipes).

In a very large skillet, melt the butter. Once melted, add the parsnips and let them simmer in the butter for about 2 minutes.

Then, add the leeks, onion, garlic, eggplant and a pinch of salt and pepper (no more than 1/4 tsp each) and cook, covered, on a low-medium heat for about 10 minutes or until all the vegetables are soft.

Add 1 cup of the vegetable broth, cover and simmer for 10 minutes or until the broth has been absorbed.

Slice the bread into 1-inch cubes and lay them in the bottom of a casserole dish.

Sprinkle the sage and rosemary over the bread.

Then, pour the vegetable mixture over the bread as well. Spread it out so it evenly covers the bread.

Stuffing (2)          Stuffing (3)

Pour the remaining cup of vegetable broth over everything, gently pushing aside the vegetable mixture to allow the broth to work through to the bread and the bottom of the casserole dish.

Bake, uncovered, for 40 minutes.

While the stuffing is baking, gently clean any dirt off your mushrooms.

Slice off the stems and gently dig out the gill-like material on the underside of the mushroom caps.

Stuffing (7)         Stuffing (11)

Place the hollowed-out mushrooms cap-side down in a baking dish and bake them in the oven (also at 350F) for about 10 minutes or until they begin to look slightly droopy or wilted. A small amount of liquid might appear inside the caps – this is a good way to know you need to remove them from the oven.

Once the stuffing is done, add a generous scoop of stuffing to each mushroom cap.

Top each with a tablespoon of cheese and place back in the oven for about 5 minutes or until the cheese is melted.

Stuffing (13)

These make for a gorgeous presentation lined up on a serving tray. I hope you enjoy them as much as Mike and I did!

Pro-Tip: Try to pick out portobello mushrooms that have high sides so they’re more cup-shaped instead of flat. These will maintain their shape a lot better after being heated up and make it easier to stuff them.

Stuffing (15)


Ratatouille with Coconut Curry Sauce

I feel bad calling myself a cooking enthusiast since I had not even heard of ratatouille until I saw the Disney movie. After seeing a rat prepare it, I thought, “I could do that.”

Coconut Curry Ratattoile (12)

But then, a lot of time went by. (A LOT of time. I just checked, and that movie was released in 2007 – yikes!)

So seven years later, I got my act together and made a decision to prepare this undoubtedly delicious meal for my in-laws, who were visiting from New York. I learned the basic gist of the recipe, and I was only feeling a little apprehensive about being able to pull it off.

But then, I was totally sidelined. The power of suggestion is absurdly effective. One second, I am happily going about my day thinking about trees and flowers (not really, just trying to make a point here), and the next, I see a commercial for pizza and suddenly, that is ALL I WANT.

As I was preparing for ratatouille-making, a friend happened to mention having had a delicious coconut curry dish at lunch.

Well. I’ll be damned. I LOVE coconut curry.

Coconut Curry Ratattoile (14)

So, since I was already feeling overwhelmed by the recipe, I made an effortless decision to swap out the sauce for a coconut curry tomato sauce.

I’ll tell you – it was an amazing decision. This dish does not disappoint, and was a hit with my in-laws (at least that’s what they told me) 🙂

Quick Disclaimer: If you don’t own a mandolin, this recipe is still possible to make – it just might drive you crazy. Make sure you have a sharp knife, at the very least!

Coconut Curry Ratattoile (13)

What You Need for the Ratatouille:

  • 1 medium zucchini squash, ends cut off
  • 1 medium summer squash, ends cut off
  • 1 large tomato
  • 1 each red bell pepper, green bell pepper and yellow bell pepper, tops cut off and de-seeded but still bell-shaped
  • 2 cups dry Jasmine or white rice

What You Need for the Coconut Curry Sauce:

  • 1 tbsp olive oil
  • 1 medium onion, diced
  • 1 clove garlic, minced
  • 1 jalepeno, minced (seeded if desired)
  • 1/2 tbsp fresh ginger, minced (powdered ginger will also work fine)
  • 1 1/2 tbsp curry powder
  • 1 28-ounce can diced tomatoes and their juices (this is equal to 3 1/2 cups diced tomatoes if you wish to stay away from canned foods)
  • 1 14-ounce can unsweetened coconut milk
  • 1 tsp sugar
  • salt and pepper to taste

Coconut Curry Ratattoile (3)

What You Do:

Preheat oven to 400F

In a large wok or skillet, pour in the olive oil and lightly simmer the onion, garlic, jalepeno and fresh ginger until soft. (If you only have powdered ginger, add it later).

Add the tomatoes and curry powder (also add ginger powder if using).  Turn heat up to bring to a slight boil and stir well.

Add the coconut milk and sugar, stirring well. Reduce heat to a simmer and cook for about 5 minutes.

Set aside, but keep warm on low heat.

Using a mandolin, thinly slice all of your vegetables. As I said, if you don’t have a mandolin, you can get away with cutting everything by hand. Try to make very thinly-sliced pieces. Thicker pieces really only impact how long the dish will take to cook.

Layer the vegetables in alternating order along the bottom of a large baking dish or dutch oven. Each time you complete a layer, spoon about 1 cup of the still-hot coconut curry tomato sauce over the veggies.

Continue layering and alternately pouring with sauce until the veggies have been used up. Depending on the size of your baking dish, you may find you have vegetables left over. This is ok! They make great snacks, after all!

Pour remaining sauce over the top, gently poking apart the vegetables to let it seep through.

Coconut Curry Ratattoile (4)  Coconut Curry Ratattoile (5)  Coconut Curry Ratattoile (9)

Cover, and place the whole concoction into the oven for about 20-30 minutes, or until the vegetables have softened and are easily pierced with a fork. You may find it takes slightly longer depending, again, on the size of your baking dish and thickness of your layers.

While the dish is baking, cook your rice according to package directions.

When everything is ready, serve the ratatouille over the rice and enjoy! It’s where French cuisine meets Indian cuisine, right? Bon’ appetite!

Coconut Curry Ratattoile (15)


Pro Tip: If you have leftovers and want to re-purpose the meal to try and pull a fast one on your family, simply pulse the ratatouille (without the rice) in a food processor with a small amount of vegetable broth to turn it into soup! Make it as chunky or pureed as you desire, and add the rice after for some additional texture.

Vegetable Saute with Kale and Corn Pesto

Potato and Pesto Pics (9)

Everyone likes to talk about how pretty fall is and how awesome the leaves are, yada yada yada. Can we chat for a second about how EVERYONE IS SICK?

I can count the number of days I’ve felt healthy since the end of summer on one hand at this point. I feel as though every time I turn around, someone is sneezing or coughing, and two days later, so am I. It obviously doesn’t help that one day it’ll be 85 degrees out and the next day it’ll be 40.

As someone who is first to brag about how infrequently I get sick, I’ve certainly had to check myself this time around. Is anyone else experiencing this? If you are, please do not come near me.

Potato and Pesto Pics (11)To cater to my tissue-cough-drop-Robitussin dependency, I embarked on this meal with full intentions of completely mailing it in. I should know better though, that the way to truly mail it in is to either do nothing so Mike ends up taking care of dinner, or to just make pasta.

Well I didn’t. This is the result of more time in the kitchen than I intended.

What You Need for the Vegetable Dish:

  • 1 cup dry Jasmine or rice of choice, cooked according to package directions
  • 5 plum tomatoes or large cherry tomatoes.
  • 1/4 lb green beans, sliced in half
  • 1 large yellow onion, thinly sliced
  • 1 each: red bell pepper, green bell pepper, yellow bell pepper, sliced into strips
  • 1/4 cup chives, chopped
  • 1 tbsp olive oil

Potato and Pesto Pics (1)          Potato and Pesto Pics (6)

What You Need for the Pesto:

  • 2 cups kale leaves, roughly shredded
  • 1/2 cup freshly grated Parmesan cheese
  • 1/2 cup olive oil
  • The corn from one cob (cooked and cut off) – or about 3/4 cup of cooked corn
  • 1/3 cup walnuts
  • 3 small garlic cloves, minced (about 3 tsp)
  • A pinch of salt and freshly ground pepper

What You Do: Potato and Pesto Pics (12)

Cook the rice according to package directions.

While the rice is cooking, pile your veggies EXCEPT the chives, into a large skillet, cover and slowly heat on low-medium until they are cooked through and the tomatoes have burst and appear pinched.

While the vegetables are cooking, pile your pesto ingredients EXCEPT the oil, into a food processor or blender. Slowly add the oil as the ingredients are mixing together until everything is combined and has formed a loose mixture similar to the consistency of dip.

Scoop out a desired amount of rice, and cover it with the cooked vegetables, adding some of the liquids for flavor.

Top with a dollop of pesto and sprinkle the chives over the pesto. Viola!

Pro Tip: Don’t make this dish if you’re too sick to stand up for more than 5 minutes.

Potato and Pesto Pics (10)

Carnival Squash Stuffed with Quinoa and Sugar-Baked Apples

Ok. I know I have some explaining to do.

Squash (10)

I’m making a somewhat sheepish return to this blog with my tail between my legs; this newest post clouded by the undeniable fact that it has been LITERALLY MONTHS since my last post, which is not only unfair to those who actually read and like my blog (thank you!) but is also really sad because I’m letting the entire fall season virtually pass by without posting any of the great fall vegetable recipes that make this time of year a true delight.

I’m sorry. I have no excuse. You should know that I have still been cooking, so you will finally get to take part in that experience. I hope these next recipes will be at least marginally useful to you, even though fall is half over.

Some exciting news though! It was my birthday the other day, which means I’ve been blogging steadily (don’t say it) for about a year! I find this to be among my top accomplishments as a person, and to celebrate, I bestow upon you this quintessentially fall dish, which I owe to the wonderful people at Barker’s Farm in Stratham, NH for hooking me up with some of the coolest must-have squashes of the season (You know how I feel about squashes – **swoon**)

Squash (11)     Squash (13)

What You Need:

  • Two medium or large carnival squashes (or four smaller ones if you’re feeding several people or prefer smaller portions) If you don’t have or can’t find a carnival squash, acorn squash is the most similar, and delicata would also be delicious.
  • 2 medium or large apples, any type (I used Cortland) peeled and cut into apple pie-type chunks
  • 1 tbsp butter, very soft or melted
  • 1 tbsp olive oil
  • 2 tbsp brown sugar
  • 1 cup diced red onion
  • 2 cloves garlic, finely chopped
  • 1 habanero or hot pepper of choice, finely chopped (optional)
  • 1 tsp chili powder
  • 1 cup dry quinoa, cooked according to package directions
  • salt and pepper to taste
  • 1/2 cup shredded cheese of your choice (I used goat cheese because that is what we had in the fridge)

Squash (18)

What You Do:

Preheat oven to 400F

Cut the squash lengthwise from stem to bottom and scoop out the seeded insides.

Lightly brush the squash’s insides with butter, lay skin-side-down on a foil-covered baking sheet, and place in the oven to bake for about 30-40 minutes, or until it appears to be caramelizing and easily lets a fork through.

While the squash is baking, cook the quinoa.

Squash (12)While the quinoa is cooking, place the garlic, onion and hot pepper in a frying pan over low-medium heat with 1 tbsp oil.

When they become soft and translucent, add the apple pieces and stir until well-mixed.

Add the brown sugar and chili powder, salt and pepper and continue stirring until the apples become warm and juicy (but still maintain their shape and don’t get mushy) and are well-mixed with the sugar and spices.

Once the quinoa is cooked, add it to the apple mixture in spoonfuls to gauge how much you need to make a nice balanced mix of quinoa and apple mixture. I found 2 cups of quinoa was enough to create a decent amount for stuffing the squash.

When the squash has cooked, place them skin-side-down in a baking dish.

Gently scoop the apple and quinoa mixture into each squash.

Sprinkle your cheese of choice over the top of each (optional) and place back in the oven for about 5 minutes or until the cheese is melted. (If you choose not to use cheese you can skip this step. It’s plenty hot at this point!)

Pro Tip: Add shredded chicken instead of or in addition to the quinoa to make it a non-vegetarian dish. If you’re a fan of raisins (I’m not), sprinkle some into the apple mixture while it’s cooking to add a new texture and flavor.

Squash (14)     Squash (16)


Healthy and Easy Crustless Summer Vegetable Quiche

Quiche (2)

I have never been so determined to make a dinner from scratch as I was when I forged ahead and baked this quiche, even though I didn’t start it until 8pm on a work night, knowing full well it wouldn’t be ready to eat until at least 9:30pm; and that’s if everything went smoothly. (It did).

Perhaps a saner person would have looked at the clock and resigned themselves to leftover Annie’s Mac and Cheese, or even a fresh salad, but I would not give up the dream of quiche. It came out of the oven so late that Mike didn’t even eat it (he had already eaten the mac and cheese and a fresh salad with toast on the side, like a smart thinker).

Quiche (5)

But I made sure to ooo and ahhh over this quiche as I helped myself to not one but THREE (small) servings, trying to savor it as the clocked ticked rapidly toward 10pm and my bedtime loomed near. I try not to eat close to going to bed, but quiche night was an exception.

It’s good. Good enough to wait well into the night for, and good enough to risk going to bed with a quiche hangover. I also need to note that the reason it didn’t maintain it’s pie-slice shape in the photos was because I insisted on eating it within a few seconds of taking it out of the oven. Let this thing cool – it’s worth it!

What You Need:

Quiche (6)

  • 1/2 of a large yellow onion, roughly chopped
  • 2 small garlic cloves, finely chopped
  • 1/2 of a green bell pepper, chopped
  • 1/2 jalapeno or habenero pepper, chopped
  • 1/4 cup chives, chopped
  • 1 1/2 cup broccoli florets
  • 1/2 cup very finely chopped kale (spinach would work well too!)
  • 3 eggs, lightly beaten
  • 1 cup almond milk (or any other milk of your choosing)
  • 1 cup shredded muenster cheese
  • 1 cup shredded cheddar cheese
  • 2 tsp dijon mustard
  • 2 tsp fresh black pepper
  • 1 tsp salt
  • 6-8 very thin slices of zucchini
  • 6-8 very thin slices of tomato

Quiche (4)What You Do:

Preheat your oven to 375F.

In a lightly oiled medium skillet, heat the garlic and onion on medium heat until the onion becomes soft and translucent.

Add the jalapeno or habenero, and bell pepper, and chives, and stir.

Add the broccoli florets and stir well to combine with the onion mixture. Add a tablespoon of water if necessary to keep the pan moist, and cover, cooking on low-medium until the broccoli has reduced, about 7 minutes.

Quiche (3)

While the broccoli mixture is cooking up, grab a small mixing bowl and combine the eggs, milk, cheeses, mustard, black pepper and salt, stirring well.

Set aside.

Before taking the broccoli mixture off the heat, add the kale and stir well.

Pack the broccoli mixture into a well-greased pie dish.

Pour the egg mixture over the broccoli filling, using a fork to gently nudge the broccoli around to let the egg mixture seep through to the sides and bottom of the pie dish. (There should still be a healthy amount of egg mixture over the top of the dish.)

In any pattern you like, place the zucchini and tomato slices around the top of the quiche. Make a happy face if you want!

Place the pie dish in the oven for about 40 minutes (check after 20-30 though – you want the egg cooked through and the top to be slightly browned and crispy but not burned, obviously).

Let cool for a few minutes before delving in, if for no other reason than to keep it in pie-slice shape 🙂

Enjoy!

Pro Tip: Have it for breakfast! Experiment with different cheeses too – I think Parmesan or feta would be absolutely delish.

Quiche (1)